")


Okay, let’s talk Taco Cups! Before we dive into the nitty-gritty of this incredibly fun and versatile recipe, I have to share a little personal story. The first time I made these Taco Cups was for a casual family get-together. My kids, who can be notoriously picky eaters, were immediately drawn to the “mini taco” look. My son, who usually turns his nose up at anything with too many mixed ingredients, actually asked for seconds, then thirds! My husband, a lover of all things taco, was impressed by how the crispy wonton shells held up without getting soggy too quickly, delivering that perfect crunch with every bite. Since then, Taco Cups have become a staple for our game nights, a go-to for potlucks (they travel surprisingly well!), and even a quick weeknight dinner when I want something a bit more exciting than standard tacos. They are a guaranteed crowd-pleaser, and the best part? They are ridiculously easy to make and customize. The aroma of the seasoned beef cooking, combined with the anticipation of those crispy, golden cups emerging from the oven, is enough to make everyone gather in the kitchen. Trust me, these little bites of joy will become a favorite in your household too!
The Ultimate Taco Cups: A Flavor Fiesta in Every Bite!
Get ready to revolutionize your taco nights, appetizer spreads, and party menus with these irresistible Taco Cups! Combining the savory goodness of classic tacos with the delightful crunch of a crispy wonton shell, all conveniently baked in a muffin tin, this recipe is a guaranteed winner. They’re perfectly portioned, easy to customize, and incredibly fun to eat. Whether you’re looking for a kid-friendly meal, a game-day snack, or a unique party appetizer, these Taco Cups deliver big on flavor and fun.
Ingredients: Your Shopping List for Taco Cup Perfection
To create approximately 24 delicious Taco Cups, you’ll need the following:
- For the Wonton Cups:
- 24 Wonton Wrappers (standard square size)
- Cooking spray or 1 tablespoon olive oil (for greasing muffin tin, if needed)
- For the Taco Filling:
- 1.5 lbs lean ground beef (or ground turkey, chicken, or plant-based crumbles)
- 1 medium yellow onion, finely chopped
- 2 cloves garlic, minced
- 2 packets (about 2 tablespoons each) low-sodium taco seasoning
- 2/3 cup water or beef broth
- 1 can (4 oz) diced green chilies, undrained (optional, for a little extra zest)
- For the Cheesy Topping:
- 2 cups shredded Mexican blend cheese (or cheddar, Monterey Jack)
- Optional Toppings & Garnishes (Choose your favorites!):
- Shredded lettuce (Iceberg or Romaine)
- Diced tomatoes
- Sour cream or Greek yogurt
- Salsa (mild, medium, or hot)
- Guacamole
- Sliced black olives
- Pickled or fresh jalapeño slices
- Chopped fresh cilantro
- Crumbled Cotija cheese
- Lime wedges for squeezing
Instructions: Crafting Your Crispy Taco Masterpieces
Follow these simple steps to create your batch of mouthwatering Taco Cups.
- Preheat and Prepare:
- Preheat your oven to 375°F (190°C).
- Lightly grease two standard 12-cup muffin tins with cooking spray or a thin layer of olive oil. This helps the wontons crisp up nicely and prevents sticking, though many wonton wrappers have enough dusting powder to prevent sticking on their own.
- Form the Wonton Cups:
- Gently press one wonton wrapper into each muffin cup. You’ll want to create a cup shape, allowing the corners to extend slightly above the rim of the muffin tin. Don’t worry if they’re not perfectly uniform; their rustic charm is part of the appeal!
- Pre-Bake the Wonton Cups (Optional but Recommended):
- For extra crispy cups, lightly spray the insides of the wonton wrappers with cooking spray.
- Bake the empty wonton cups for 5-7 minutes, or until they are lightly golden and starting to crisp. Keep a close eye on them, as they can brown quickly. This pre-baking step helps prevent a soggy bottom once the filling is added. Remove from the oven and set aside.
- Cook the Taco Filling:
- In a large skillet or Dutch oven, cook the ground beef (or your chosen protein) over medium-high heat, breaking it apart with a spoon, until it’s no longer pink.
- Add the chopped onion and cook for another 3-5 minutes, until the onion is softened and translucent.
- Stir in the minced garlic and cook for another minute until fragrant. Be careful not to burn the garlic.
- Drain off any excess grease from the skillet. This is crucial for preventing greasy taco cups.
- Return the skillet to the heat. Stir in the taco seasoning, water (or beef broth), and the optional diced green chilies (if using).
- Bring the mixture to a simmer, then reduce the heat to low. Let it simmer for 8-10 minutes, or until most of the liquid has been absorbed and the filling has thickened. You want a flavorful, moist filling, not a soupy one. Taste and adjust seasoning if necessary.
- Assemble the Taco Cups:
- Carefully spoon about 1.5 to 2 tablespoons of the cooked taco filling into each pre-baked (or unbaked, if you skipped step 3) wonton cup. Avoid overfilling, as this can make them difficult to eat and may cause spillage.
- Add the Cheese:
- Sprinkle a generous tablespoon or two of shredded cheese over the meat filling in each cup.
- Bake to Perfection:
- Return the filled muffin tins to the oven.
- Bake for another 8-12 minutes, or until the cheese is melted and bubbly, and the edges of the wonton wrappers are golden brown and crispy. If you didn’t pre-bake the wontons, they might need a few extra minutes, closer to 12-15 minutes total fill-and-bake time.
- Cool and Garnish:
- Once baked, carefully remove the muffin tins from the oven. Let the Taco Cups cool in the tins for about 5 minutes. This helps them set and makes them easier to remove without breaking.
- Gently run a thin knife or small offset spatula around the edges of any cups that seem stuck, then carefully lift them out and arrange them on a serving platter.
- Now for the fun part! Top your warm Taco Cups with your desired array of fresh toppings: shredded lettuce, diced tomatoes, a dollop of sour cream, a spoonful of salsa, guacamole, olives, jalapeños, and a sprinkle of fresh cilantro.
Nutrition Facts: A Guilt-Free Indulgence
- Servings: This recipe makes approximately 24 Taco Cups.
- Calories per serving: Approximately 120-150 calories per Taco Cup (this can vary significantly based on the leanness of your meat, the amount of cheese, and the toppings chosen).
Disclaimer: Nutritional information is an estimate and can vary based on specific ingredients and quantities used.
Preparation Time: Quick & Easy Fiesta Fare
- Prep Time: 20-25 minutes (includes chopping vegetables and browning meat)
- Cook Time: 18-25 minutes (includes pre-baking wontons and final baking)
- Total Time: Approximately 40-50 minutes
This makes Taco Cups an excellent option for a relatively quick weeknight meal or an appetizer that doesn’t require hours in the kitchen.
How to Serve: Your Taco Cup Presentation Guide
Serving these Taco Cups is almost as fun as eating them! Here are some ideas to make your Taco Cup experience even more memorable:
- The Classic Platter:
- Arrange the baked and slightly cooled Taco Cups on a large serving platter or wooden board.
- Have small bowls of all the toppings arranged around the platter or separately, allowing guests to customize their own cups. This “build-your-own” approach is always a hit.
- Taco Cup Bar:
- Set up a dedicated “Taco Cup Bar” area.
- Place the warm Taco Cups at the beginning of the line.
- Follow with an array of toppings in individual bowls, each with its own serving spoon. Think:
- Greens: Shredded lettuce, chopped cilantro.
- Veggies: Diced tomatoes, diced onions (red or white), sliced black olives, corn salsa.
- Spice: Sliced fresh or pickled jalapeños, various hot sauces, spicy salsa.
- Creamy: Sour cream, Greek yogurt, guacamole, queso fresco or cotija cheese.
- Sauces: Mild, medium, and hot salsa; pico de gallo; creamy cilantro-lime dressing.
- Individual Servings:
- For a more formal (yet still fun) plated appetizer, arrange 2-3 Taco Cups on small plates.
- Artfully add a small dollop of sour cream or guacamole and a sprinkle of cilantro to each cup before serving. A lime wedge on the side is a nice touch.
- Party Perfect:
- These are ideal finger foods for parties. Ensure you have plenty of napkins!
- You can make a large batch and keep them warm in a low oven (around 200°F or 93°C) for a short period, but add fresh toppings just before guests grab them to prevent wilting.
- Kid-Friendly Presentation:
- Let kids decorate their own Taco Cups. They’ll love the autonomy!
- Offer milder toppings for younger children, such as plain shredded cheese, mild salsa, and sour cream.
- Accompaniments:
- Serve alongside other Mexican-inspired dishes like:
- Mexican rice
- Refried beans or black beans
- Chips and salsa/guacamole
- A simple side salad with a lime vinaigrette
- Cornbread or elote (Mexican street corn)
- Serve alongside other Mexican-inspired dishes like:
Remember, the key is to have fun with it! The versatility of Taco Cups means they can be dressed up or down for any occasion.
Additional Tips for Taco Cup Triumph (5 Tips)
Elevate your Taco Cup game with these expert pointers:
- Wonton Wisdom for Ultimate Crispiness:
The wonton wrapper is your vessel, so treat it right! For the crispiest results, don’t skip the pre-baking step. Lightly spraying the inside of the wonton cups with cooking spray before pre-baking also helps achieve that delightful crunch. If you find your wonton wrappers are a bit dry or prone to cracking when you press them into the muffin tin, you can very lightly dampen the edges with a fingertip dipped in water to make them more pliable. Be careful not to oversaturate. Also, consider using two wonton wrappers per cup for an extra sturdy and even crispier shell, especially if you’re planning on very generous fillings. - Meat Matters & Flavor Boosters:
While lean ground beef is classic, don’t be afraid to experiment! Ground turkey, chicken, or even crumbled chorizo can offer delicious variations. For a vegetarian option, use black beans, lentils, or a good quality plant-based crumble. Regardless of your protein, draining the fat thoroughly after browning is non-negotiable for preventing soggy cups. To deepen the flavor of your filling, consider adding a teaspoon of smoked paprika or a pinch of cumin along with your taco seasoning. A squeeze of lime juice into the cooked meat mixture right before filling the cups can also brighten the flavors significantly. - Cheese Choices & Melty Magic:
Pre-shredded cheese is convenient, but shredding your own cheese from a block often results in a smoother, more superior melt because pre-shredded cheeses contain anti-caking agents. A Mexican blend is perfect, but feel free to use sharp cheddar, Monterey Jack, Colby Jack, or even pepper jack for a spicy kick. For an extra creamy and rich cheese layer, you can mix a little cream cheese (softened) into your shredded cheese before topping the cups. - Make-Ahead Strategies for Stress-Free Entertaining:
Taco Cups are fantastic for prepping in advance. You can cook the taco meat filling completely, let it cool, and store it in an airtight container in the refrigerator for up to 3 days. You can also pre-bake the wonton cups, let them cool completely, and store them in an airtight container at room temperature for a day. When ready to serve, simply fill the pre-baked cups with the (reheated, if necessary) meat, top with cheese, and bake until heated through and the cheese is bubbly. This significantly cuts down on day-of preparation. - Topping Tactics & Temperature Contrast:
The beauty of Taco Cups often lies in the contrast between the warm, savory filling and the cool, fresh toppings. To maintain this delightful contrast, always add your cold toppings (lettuce, tomatoes, sour cream, guacamole) after the Taco Cups have come out of the oven and cooled for a few minutes. If you add them before baking or immediately after, the lettuce will wilt, and the sour cream can become runny. Set up a topping bar so everyone can customize their cups just before eating, ensuring every bite is perfect.
FAQ Section: Your Taco Cup Conundrums Solved!
Here are answers to some commonly asked questions about making Taco Cups:
- Q: Can I use something other than wonton wrappers for the cups?
A: Absolutely! While wonton wrappers provide a unique, light crispiness, you can certainly adapt this recipe. Small flour or corn tortillas (like street taco size) can be pressed into muffin tins; they’ll yield a softer, more traditional taco shell texture. You might need to warm them slightly to make them pliable. Phyllo dough (several layers, buttered) can create a flaky, delicate cup, though it’s more fragile. Even refrigerated biscuit dough or crescent roll dough, pressed thin, can be used for a heartier, more bread-like cup. Baking times may need to be adjusted for these alternatives. - Q: How can I make these Taco Cups vegetarian or vegan?
A: It’s very easy! For a vegetarian version, substitute the ground meat with a can of well-rinsed black beans or pinto beans (lightly mashed or whole), cooked lentils, crumbled tofu or tempeh (seasoned well), or a mixture of finely chopped mushrooms and walnuts sautéed until tender. You can also use plant-based ground meat alternatives. For a vegan version, ensure your wonton wrappers are egg-free (most are, but always check ingredients). Use a plant-based meat substitute or the bean/lentil options, and top with vegan shredded cheese. For toppings, use vegan sour cream, plenty of salsa, guacamole, and fresh veggies. - Q: How do I store leftover Taco Cups? And how do I reheat them?
A: It’s best to store leftover Taco Cups and toppings separately. Store the baked (and cooled) Taco Cups (with meat and cheese filling) in an airtight container in the refrigerator for up to 2-3 days. Store fresh toppings like lettuce, tomatoes, and sour cream in their own containers. To reheat, place the Taco Cups on a baking sheet in a preheated oven at 350°F (175°C) for about 8-10 minutes, or until heated through and the wonton edges re-crisp. You can also use an air fryer for a few minutes for excellent crispiness. Avoid microwaving, as it can make the wonton wrappers soft and chewy. Add fresh toppings after reheating. - Q: Can I freeze Taco Cups?
A: Yes, with a few considerations. For best results, it’s better to freeze components separately. You can freeze the cooked taco meat filling in a freezer-safe container for up to 3 months. You can also freeze the pre-baked, unfilled wonton cups. Let them cool completely, then flash freeze on a baking sheet before transferring to a freezer bag. To assemble, thaw the meat and cups (or use cups from frozen, adding a few minutes to baking time), fill, add cheese, and bake. You can freeze fully assembled and baked (but untopped) Taco Cups, but the wonton texture might not be as perfectly crisp upon reheating. If freezing assembled cups, let them cool completely, flash freeze on a baking sheet, then transfer to a freezer bag or container. Reheat from frozen in the oven. - Q: My wonton wrappers keep tearing when I press them into the muffin tin. What am I doing wrong?
A: This can happen if the wonton wrappers are a bit dry or if you’re being too forceful. First, ensure your wonton wrappers are fresh and haven’t dried out. Keep the package sealed while you’re working. If they seem brittle, you can try this: take a slightly damp (not wet) paper towel and lay it over the stack of wontons you’re not currently using to keep them pliable. When pressing a wrapper into the cup, be gentle. Guide it in rather than ramming it. If a small tear occurs, you can often patch it with a small piece from another wonton wrapper, lightly moistened to stick, or simply overlap the torn edges slightly. Sometimes, the brand of wonton wrapper can make a difference too; some are more delicate than others. Using two wrappers per cup, as mentioned in the tips, can also provide more structural integrity.
Enjoy your Taco Cup adventure! They’re a surefire way to bring smiles and satisfied appetites to any table.
Print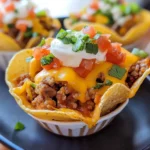
Taco Cups Recipe
Ingredients
- For the Wonton Cups:
- 24 Wonton Wrappers (standard square size)
- Cooking spray or 1 tablespoon olive oil (for greasing muffin tin, if needed)
- For the Taco Filling:
- 1.5 lbs lean ground beef (or ground turkey, chicken, or plant-based crumbles)
- 1 medium yellow onion, finely chopped
- 2 cloves garlic, minced
- 2 packets (about 2 tablespoons each) low-sodium taco seasoning
- 2/3 cup water or beef broth
- 1 can (4 oz) diced green chilies, undrained (optional, for a little extra zest)
- For the Cheesy Topping:
- 2 cups shredded Mexican blend cheese (or cheddar, Monterey Jack)
- Optional Toppings & Garnishes (Choose your favorites!):
- Shredded lettuce (Iceberg or Romaine)
- Diced tomatoes
- Sour cream or Greek yogurt
- Salsa (mild, medium, or hot)
- Guacamole
- Sliced black olives
- Pickled or fresh jalapeño slices
- Chopped fresh cilantro
- Crumbled Cotija cheese
- Lime wedges for squeezing
Instructions
- Preheat and Prepare:
- Preheat your oven to 375°F (190°C).
- Lightly grease two standard 12-cup muffin tins with cooking spray or a thin layer of olive oil. This helps the wontons crisp up nicely and prevents sticking, though many wonton wrappers have enough dusting powder to prevent sticking on their own.
- Form the Wonton Cups:
- Gently press one wonton wrapper into each muffin cup. You’ll want to create a cup shape, allowing the corners to extend slightly above the rim of the muffin tin. Don’t worry if they’re not perfectly uniform; their rustic charm is part of the appeal!
- Pre-Bake the Wonton Cups (Optional but Recommended):
- For extra crispy cups, lightly spray the insides of the wonton wrappers with cooking spray.
- Bake the empty wonton cups for 5-7 minutes, or until they are lightly golden and starting to crisp. Keep a close eye on them, as they can brown quickly. This pre-baking step helps prevent a soggy bottom once the filling is added. Remove from the oven and set aside.
- Cook the Taco Filling:
- In a large skillet or Dutch oven, cook the ground beef (or your chosen protein) over medium-high heat, breaking it apart with a spoon, until it’s no longer pink.
- Add the chopped onion and cook for another 3-5 minutes, until the onion is softened and translucent.
- Stir in the minced garlic and cook for another minute until fragrant. Be careful not to burn the garlic.
- Drain off any excess grease from the skillet. This is crucial for preventing greasy taco cups.
- Return the skillet to the heat. Stir in the taco seasoning, water (or beef broth), and the optional diced green chilies (if using).
- Bring the mixture to a simmer, then reduce the heat to low. Let it simmer for 8-10 minutes, or until most of the liquid has been absorbed and the filling has thickened. You want a flavorful, moist filling, not a soupy one. Taste and adjust seasoning if necessary.
- Assemble the Taco Cups:
- Carefully spoon about 1.5 to 2 tablespoons of the cooked taco filling into each pre-baked (or unbaked, if you skipped step 3) wonton cup. Avoid overfilling, as this can make them difficult to eat and may cause spillage.
- Add the Cheese:
- Sprinkle a generous tablespoon or two of shredded cheese over the meat filling in each cup.
- Bake to Perfection:
- Return the filled muffin tins to the oven.
- Bake for another 8-12 minutes, or until the cheese is melted and bubbly, and the edges of the wonton wrappers are golden brown and crispy. If you didn’t pre-bake the wontons, they might need a few extra minutes, closer to 12-15 minutes total fill-and-bake time.
- Cool and Garnish:
- Once baked, carefully remove the muffin tins from the oven. Let the Taco Cups cool in the tins for about 5 minutes. This helps them set and makes them easier to remove without breaking.
- Gently run a thin knife or small offset spatula around the edges of any cups that seem stuck, then carefully lift them out and arrange them on a serving platter.
- Now for the fun part! Top your warm Taco Cups with your desired array of fresh toppings: shredded lettuce, diced tomatoes, a dollop of sour cream, a spoonful of salsa, guacamole, olives, jalapeños, and a sprinkle of fresh cilantro.
Nutrition
- Serving Size: One Normal Portion
- Calories: 120-150