")


After countless recipe trials and family feedback sessions, I can confidently say that Sharon Rigsby’s New York Strip Roast recipe is a home run. From the moment the aroma starts wafting through the kitchen to the first succulent bite, this roast is a guaranteed crowd-pleaser. My family, usually a tough crowd to impress, devoured it with gusto, raving about the incredible tenderness and rich, beefy flavor. What truly stands out is the simplicity of the recipe; just a handful of ingredients and a straightforward cooking method yield a roast that rivals those from upscale steakhouses. If you’re looking for a centerpiece dish that’s both impressive and surprisingly easy to execute, look no further. This New York Strip Roast recipe, cooked low and slow in a cast iron skillet, is destined to become a cherished staple in your culinary repertoire.
Ingredients
This recipe champions simplicity, highlighting the quality of the beef and allowing its natural flavors to shine. You won’t find a long list of complicated ingredients here, just the essentials to create a truly exceptional roast.
- 4 pound New York Strip Roast or Top Loin Roast boneless: The star of the show! Opt for a roast with good marbling for maximum flavor and tenderness. A boneless roast is easier to carve and ensures even cooking. Choosing a quality cut is paramount for this recipe, as the flavor of the beef is central to the dish. Look for roasts that are well-marbled, meaning they have streaks of fat running through the lean meat. This fat will render during cooking, basting the roast from within and contributing to both flavor and moisture. If you have the option, consider a prime-grade roast for an even more luxurious experience, but choice-grade will also deliver fantastic results. Don’t be afraid to ask your butcher for assistance in selecting the best roast available. They can provide valuable insights into the quality and cut of meat.
- 2 tablespoons olive oil divided: Olive oil plays a dual role in this recipe. Firstly, it’s used to rub the roast before seasoning, helping the salt and pepper adhere and also promoting browning during the searing process. Secondly, a tablespoon of olive oil is used for searing in the cast iron skillet, providing a high-heat cooking medium that contributes to the development of a flavorful crust. Extra virgin olive oil is a great choice for its flavor and health benefits, but regular olive oil will also work perfectly well. The key is to use a good quality olive oil that can withstand high heat without smoking excessively.
- 1 tablespoon kosher salt: Kosher salt is preferred over table salt in many culinary applications, including this roast, due to its larger, coarser crystals. These crystals distribute more evenly over the surface of the meat and draw out moisture more effectively during the dry brining process (refrigerating the roast uncovered). Kosher salt also has a cleaner, less metallic taste compared to iodized table salt. When measuring kosher salt, it’s important to note that it’s less dense than table salt, so a tablespoon of kosher salt will weigh less than a tablespoon of table salt. For this recipe, using a tablespoon of kosher salt will provide the perfect level of seasoning without being overly salty.
- 1 teaspoon ground black pepper: Freshly ground black pepper is always recommended for the best flavor. Pre-ground pepper can lose its pungency and aroma over time. Grinding your own pepper right before use releases its volatile oils, resulting in a much more vibrant and flavorful seasoning. Black pepper complements the richness of the beef beautifully, adding a touch of warmth and spice. Adjust the amount of pepper to your personal preference, but a teaspoon provides a balanced flavor profile that enhances, rather than overpowers, the natural taste of the roast.
Instructions
This New York Strip Roast recipe stands out for its straightforward instructions and minimal fuss. The key to its success lies in the dry brining process and the low-and-slow cooking method, both of which contribute to the exceptional tenderness and juiciness of the final dish. Follow these steps carefully, and you’ll be rewarded with a restaurant-quality roast that will impress your family and guests.
- One to three days before you plan to cook the roast, place a rack in a baking pan and put the unwrapped beef on it. Next, place the pan in the refrigerator and leave it uncovered for one to three days. This initial step is crucial for achieving a deeply flavorful and beautifully browned roast. This process is known as dry brining. By placing the uncovered roast in the refrigerator on a rack, you are allowing the surface of the meat to dry out. This might seem counterintuitive, but it’s essential for creating a Maillard reaction – the chemical reaction between amino acids and reducing sugars that occurs when meat is exposed to high heat, resulting in browning and complex flavors. The rack is important because it allows air to circulate around the roast, ensuring even drying. The dry environment of the refrigerator also helps to concentrate the beef’s natural flavors. The longer you dry brine, up to three days, the more pronounced the flavor and the better the sear will be. If you are short on time, even a 24-hour dry brine will make a noticeable difference. Make sure your refrigerator is clean and free of strong odors, as the roast will be exposed.
- When ready to cook the roast, take it out of the refrigerator about an hour beforehand and let it come to room temperature. Bringing the roast to room temperature before cooking is another critical step for even cooking. When a cold roast is placed directly into a hot oven, the outside cooks much faster than the inside. This can lead to an overcooked exterior and an undercooked interior. Allowing the roast to sit at room temperature for about an hour helps to equalize its internal temperature, ensuring that it cooks more evenly throughout. This results in a roast that is perfectly cooked from edge to edge, with no dry or overcooked outer layers. Don’t leave the roast out for longer than two hours at room temperature for food safety reasons. This hour-long rest also allows the dry brine to continue working its magic, further enhancing the flavor of the roast.
- Preheat the oven to 250 degrees F. The low oven temperature of 250 degrees Fahrenheit is key to the “low and slow” cooking method that makes this roast so incredibly tender and juicy. Cooking at a low temperature allows the roast to cook gently and evenly, preventing it from drying out and toughening. This method also allows the connective tissues in the meat to break down slowly, resulting in a melt-in-your-mouth texture. Preheating the oven ensures that it reaches the desired temperature before you place the roast inside, guaranteeing consistent cooking from the start. Use an oven thermometer to verify the accuracy of your oven temperature, as oven temperatures can sometimes vary.
- Using a sharp knife, remove all of the fat and any silver skin from the outside of the meat, and if you have any hard, dry spots from it sitting in the refrigerator trim those off as well. Trimming the roast is an important step for both aesthetics and cooking quality. Excess fat can render unevenly and cause splattering in the oven. Silver skin, a thin, tough membrane found on some cuts of beef, does not break down during cooking and can become chewy and unpleasant. Removing it ensures a more tender and enjoyable eating experience. Any hard, dry spots that may have formed during the dry brining process should also be trimmed off, as these areas can become overly tough during cooking. Use a sharp knife, such as a boning knife or a chef’s knife, to carefully trim away the fat and silver skin. You don’t need to remove all the fat, just the large, thick pieces and the silver skin. Leaving a thin layer of fat will help to keep the roast moist and flavorful.
- Rub the beef with one tablespoon of olive oil and sprinkle the kosher salt and pepper liberally all over it. This is the simple yet effective seasoning for the roast. Rubbing the roast with olive oil helps the salt and pepper adhere evenly and also contributes to browning during searing. Sprinkle the kosher salt and freshly ground black pepper liberally over all sides of the roast, ensuring that every surface is seasoned. Don’t be shy with the seasoning; a 4-pound roast needs a generous amount of salt and pepper to bring out its flavor. Pat the seasoning into the roast to help it adhere. This simple seasoning allows the natural beefy flavor of the New York Strip Roast to shine through, while the salt and pepper enhance and complement it.
- Heat one tablespoon of olive oil in a heavy-duty oven-safe skillet over medium-high heat and when it is almost smoking add the beef. Sear it on the top, bottom, and sides for one to two minutes each, or until each side is nicely browned. Searing the roast in a hot cast iron skillet before oven roasting is another crucial step for developing flavor and texture. Searing creates a beautiful, flavorful crust on the outside of the roast through the Maillard reaction. A cast iron skillet is ideal for searing because it heats evenly and retains heat exceptionally well, allowing you to achieve a deep, even sear. Heat the olive oil in the skillet over medium-high heat until it is shimmering and almost smoking. This indicates that the skillet is hot enough for searing. Carefully place the roast in the hot skillet and sear it on all sides – top, bottom, and ends – for one to two minutes per side, or until each side is nicely browned. You are not trying to cook the roast through at this stage, just to develop a flavorful crust. The searing process should be quick and efficient. Be careful not to overcrowd the skillet, as this can lower the temperature and prevent proper searing. If your roast is too large for your skillet, you may need to sear it in batches.
- Place the pan in the oven and do not cover. Cook the roast until a meat thermometer inserted through in the thickest part registers five to ten degrees below your preferred degree of doneness. For maximum juiciness and flavor, I recommend not cooking this roast well-done. Once the roast is seared, transfer the cast iron skillet directly to the preheated oven. Do not cover the roast, as this will steam it rather than roast it, preventing the crust from becoming crisp and flavorful. Cook the roast in the oven until it reaches your desired internal temperature. The best way to determine doneness is to use an instant-read digital meat thermometer. Insert the thermometer into the thickest part of the roast, avoiding the bone if there is one. Refer to a meat temperature chart for your preferred level of doneness. For medium-rare, aim for 130-135 degrees Fahrenheit before resting. For medium, aim for 135-140 degrees Fahrenheit before resting. Remember that the roast will continue to cook and rise in temperature by about 5-10 degrees Fahrenheit during the resting period. It is crucial not to overcook the New York Strip Roast, as it can become dry and tough. For maximum juiciness and flavor, it is recommended to cook it to medium-rare or medium.
- When the roast comes up to the desired temperature, carefully remove it from the oven using a heavy-duty oven mitt. Tent loosely with foil and allow it to rest for at least 20 minutes before slicing. The temperature of the roast will rise an additional five to ten degrees while it rests. Resting the roast is as important as the cooking process itself. During cooking, the juices in the meat are pushed towards the center. Resting allows these juices to redistribute evenly throughout the roast, resulting in a more tender and flavorful final product. When the roast reaches your desired temperature, carefully remove the cast iron skillet from the oven using oven mitts, as the skillet will be extremely hot. Transfer the roast to a cutting board and tent it loosely with aluminum foil. Do not wrap it tightly, as this will steam the roast and soften the crust. Allow the roast to rest for at least 20 minutes, and even longer is better if time permits. During this resting period, the internal temperature of the roast will continue to rise by about 5-10 degrees Fahrenheit, reaching its final temperature. This carryover cooking is important to consider when determining when to remove the roast from the oven.
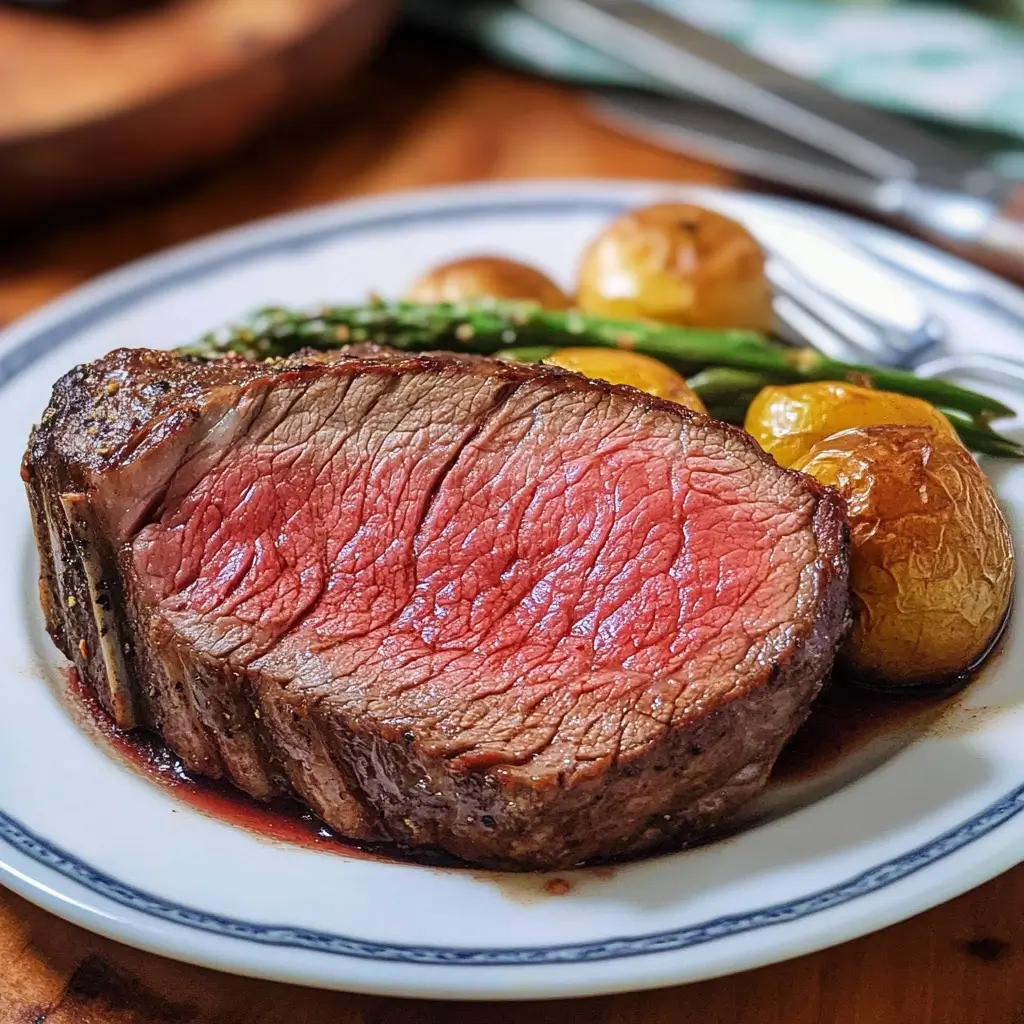
- Thinly slice the beef and serve immediately. Once the roast has rested, it is ready to be sliced and served. Use a sharp carving knife to thinly slice the roast against the grain. Slicing against the grain means cutting perpendicular to the muscle fibers, which makes the meat more tender and easier to chew. Serve the sliced roast immediately while it is still warm and juicy. The aroma and flavor of freshly sliced New York Strip Roast are truly irresistible.
Nutrition Facts
While indulging in a delicious New York Strip Roast, it’s helpful to have a general idea of its nutritional profile. Please note that these are estimates and can vary based on the specific cut of beef and portion sizes.
Servings: 8 servings
Calories: 192 kcal (per serving – Please note this calorie count seems unusually low and likely refers to a very small serving size or excludes the beef itself. A more realistic calorie count for a serving of New York Strip Roast would be significantly higher, likely in the range of 400-600 calories per serving depending on portion size and fat content. Always consult reliable nutritional databases for accurate information.)
It’s important to remember that New York Strip Roast is a rich source of protein and essential nutrients like iron and B vitamins. When enjoyed in moderation as part of a balanced diet, it can be a healthy and satisfying meal. Pairing it with plenty of vegetables and whole grains will further enhance its nutritional value.
Preparation Time
This recipe, while yielding impressive results, is surprisingly manageable in terms of preparation time. The active prep time is minimal, with the majority of the time spent on cooking and resting.
Prep Time: 10 minutes mins (excluding the dry brining time, which is done in advance)
Cook Time: 40 minutes mins (This cook time is an estimate and will vary depending on the size and thickness of your roast, as well as your desired level of doneness. Always use a meat thermometer to ensure accurate cooking.)
Total Time: 51 minutes mins (excluding the dry brining time)
Don’t be intimidated by the cook time; the low and slow method is mostly hands-off. You can use this time to prepare side dishes or relax while the roast is gently cooking in the oven. The advance dry brining is crucial for the best results, but requires minimal active effort.
How to Serve
New York Strip Roast is an elegant and versatile main dish that pairs beautifully with a variety of sides and accompaniments. Here are some serving suggestions to elevate your meal:
- Classic Sides:
- Roasted Vegetables: Potatoes, carrots, Brussels sprouts, asparagus, or broccoli roasted with olive oil, herbs, and garlic are classic and complementary choices. Roast them alongside the beef in the oven for convenience.
- Mashed Potatoes: Creamy mashed potatoes or garlic mashed potatoes are a comforting and satisfying side dish that soaks up the delicious pan juices from the roast.
- Creamed Spinach: A rich and decadent creamed spinach provides a lovely contrast to the beef and adds a touch of elegance.
- Yorkshire Pudding: If you’re aiming for a truly traditional roast dinner experience, Yorkshire pudding is a must-have. These light and airy puffs are perfect for soaking up gravy.
- Sauces and Gravies:
- Red Wine Reduction: A simple red wine reduction sauce, made with pan drippings and red wine, adds depth and richness to the roast.
- Au Jus: Serve the roast with its natural pan juices, or “au jus,” for a pure beefy flavor.
- Horseradish Cream Sauce: A tangy horseradish cream sauce provides a zesty counterpoint to the richness of the beef.
- Chimichurri: For a vibrant and herbaceous option, serve with a fresh chimichurri sauce.
- Salads and Starters:
- Simple Green Salad: A crisp green salad with a light vinaigrette provides a refreshing contrast to the richness of the roast.
- Caesar Salad: A classic Caesar salad is always a crowd-pleaser and pairs well with beef.
- Caprese Salad: A Caprese salad with fresh tomatoes, mozzarella, and basil is a light and flavorful starter.
- Presentation Ideas:
- Carve at the Table: For a dramatic presentation, carve the roast at the table and serve family-style.
- Garnish with Fresh Herbs: Garnish the sliced roast with fresh rosemary, thyme, or parsley for a touch of color and aroma.
- Arrange on a Platter: Arrange the sliced roast attractively on a platter, surrounded by your chosen side dishes.
Additional Tips for the Perfect New York Strip Roast
To ensure your New York Strip Roast is a resounding success, consider these helpful tips:
- Invest in a Good Meat Thermometer: A reliable instant-read digital meat thermometer is the most essential tool for cooking any roast to perfection. It eliminates guesswork and ensures that your roast is cooked to your desired level of doneness without overcooking or undercooking. Insert the thermometer into the thickest part of the roast, away from any bones, to get an accurate reading.
- Don’t Skip the Dry Brine: While it requires planning ahead, the dry brining process is a game-changer for flavor and sear. It enhances the beef’s natural flavor, draws out moisture for a better sear, and results in a more tender roast. Even a 24-hour dry brine will make a noticeable difference.
- Get the Cast Iron Skillet Hot: When searing the roast, ensure your cast iron skillet is preheated properly over medium-high heat and the oil is shimmering and almost smoking before adding the beef. A hot skillet is crucial for achieving a deep, flavorful crust. Don’t overcrowd the skillet; sear the roast in batches if necessary.
- Rest the Roast Adequately: Resist the temptation to slice into the roast immediately after it comes out of the oven. Resting for at least 20 minutes, and ideally longer, is essential for allowing the juices to redistribute throughout the meat, resulting in a more tender and juicy roast. Tent it loosely with foil to keep it warm without steaming the crust.
- Slice Against the Grain: Always slice the roast against the grain for maximum tenderness. Identify the direction of the muscle fibers and cut perpendicular to them. This shortens the muscle fibers, making the meat easier to chew and more tender. Use a sharp carving knife for clean, even slices.
Frequently Asked Questions (FAQ)
Here are some common questions and answers related to preparing New York Strip Roast:
Q1: Can I use a different cut of beef for this recipe?
A: While this recipe is specifically designed for New York Strip Roast (also known as Top Loin Roast), you could potentially use other similar cuts such as ribeye roast or sirloin roast. However, cooking times and tenderness may vary. Ribeye roast is generally more marbled and forgiving, while sirloin roast is leaner and may require slightly different cooking times. For the best results and the flavor profile intended by this recipe, sticking with New York Strip Roast is recommended. If you do choose to use a different cut, always use a meat thermometer to ensure accurate doneness and adjust cooking times accordingly.
Q2: What if I don’t have a cast iron skillet? Can I use a different type of pan?
A: A cast iron skillet is ideal for this recipe due to its excellent heat retention and even heating capabilities, which are crucial for searing. However, if you don’t have a cast iron skillet, you can use another heavy-duty, oven-safe skillet. Stainless steel skillets or oven-safe Dutch ovens can also work. Avoid using thin or non-oven-safe pans. If your skillet is not oven-safe, you can sear the roast in the skillet on the stovetop and then transfer it to a roasting pan for oven roasting. Just be sure to choose a roasting pan that is appropriately sized for the roast.
Q3: How do I know when the roast is cooked to the correct temperature?
A: The most accurate way to determine doneness is by using an instant-read digital meat thermometer. Insert the thermometer into the thickest part of the roast, avoiding any bones. Refer to a meat temperature chart for your desired level of doneness. For medium-rare, aim for 130-135 degrees Fahrenheit before resting. For medium, aim for 135-140 degrees Fahrenheit before resting. Remember that the internal temperature will rise during resting. Visual cues, such as the color of the juices, are not reliable indicators of doneness. A meat thermometer is your best friend for perfectly cooked roast beef.
Q4: Can I make this roast ahead of time?
A: While New York Strip Roast is best served immediately after resting, you can prepare certain components ahead of time. You can dry brine the roast up to three days in advance. You can also prepare side dishes or sauces ahead of time. However, it is not recommended to fully cook and then reheat the roast, as this can dry it out and affect its texture. If you need to prepare it partially in advance, you could sear the roast ahead of time and then complete the oven roasting closer to serving time. However, for optimal results, cooking and serving the roast on the same day is ideal.
Q5: What are some good leftover ideas for New York Strip Roast?
A: Leftover New York Strip Roast is incredibly versatile and can be used in a variety of delicious dishes. Here are a few ideas:
- Beef Sandwiches: Thinly slice the leftover roast and use it for roast beef sandwiches with your favorite toppings.
- Beef Salad: Cube or slice the roast and add it to a salad for a protein-packed meal.
- Beef Stroganoff: Use leftover roast beef in a quick and easy beef stroganoff.
- Beef Tacos or Fajitas: Shred or slice the roast and use it as filling for tacos or fajitas.
- Beef Hash: Dice the roast and combine it with potatoes, onions, and peppers for a hearty beef hash.
- Beef Soup or Stew: Add cubed roast beef to soups or stews for extra flavor and protein.
Store leftover roast beef in an airtight container in the refrigerator for up to 3-4 days. Reheat gently to prevent drying it out.
Print
New York Strip Roast Recipe
Ingredients
- 4 pound New York Strip Roast or Top Loin Roast boneless: The star of the show! Opt for a roast with good marbling for maximum flavor and tenderness. A boneless roast is easier to carve and ensures even cooking. Choosing a quality cut is paramount for this recipe, as the flavor of the beef is central to the dish. Look for roasts that are well-marbled, meaning they have streaks of fat running through the lean meat. This fat will render during cooking, basting the roast from within and contributing to both flavor and moisture. If you have the option, consider a prime-grade roast for an even more luxurious experience, but choice-grade will also deliver fantastic results. Don’t be afraid to ask your butcher for assistance in selecting the best roast available. They can provide valuable insights into the quality and cut of meat.
- 2 tablespoons olive oil divided: Olive oil plays a dual role in this recipe. Firstly, it’s used to rub the roast before seasoning, helping the salt and pepper adhere and also promoting browning during the searing process. Secondly, a tablespoon of olive oil is used for searing in the cast iron skillet, providing a high-heat cooking medium that contributes to the development of a flavorful crust. Extra virgin olive oil is a great choice for its flavor and health benefits, but regular olive oil will also work perfectly well. The key is to use a good quality olive oil that can withstand high heat without smoking excessively.
- 1 tablespoon kosher salt: Kosher salt is preferred over table salt in many culinary applications, including this roast, due to its larger, coarser crystals. These crystals distribute more evenly over the surface of the meat and draw out moisture more effectively during the dry brining process (refrigerating the roast uncovered). Kosher salt also has a cleaner, less metallic taste compared to iodized table salt. When measuring kosher salt, it’s important to note that it’s less dense than table salt, so a tablespoon of kosher salt will weigh less than a tablespoon of table salt. For this recipe, using a tablespoon of kosher salt will provide the perfect level of seasoning without being overly salty.
- 1 teaspoon ground black pepper: Freshly ground black pepper is always recommended for the best flavor. Pre-ground pepper can lose its pungency and aroma over time. Grinding your own pepper right before use releases its volatile oils, resulting in a much more vibrant and flavorful seasoning. Black pepper complements the richness of the beef beautifully, adding a touch of warmth and spice. Adjust the amount of pepper to your personal preference, but a teaspoon provides a balanced flavor profile that enhances, rather than overpowers, the natural taste of the roast.
Instructions
- One to three days before you plan to cook the roast, place a rack in a baking pan and put the unwrapped beef on it. Next, place the pan in the refrigerator and leave it uncovered for one to three days. This initial step is crucial for achieving a deeply flavorful and beautifully browned roast. This process is known as dry brining. By placing the uncovered roast in the refrigerator on a rack, you are allowing the surface of the meat to dry out. This might seem counterintuitive, but it’s essential for creating a Maillard reaction – the chemical reaction between amino acids and reducing sugars that occurs when meat is exposed to high heat, resulting in browning and complex flavors. The rack is important because it allows air to circulate around the roast, ensuring even drying. The dry environment of the refrigerator also helps to concentrate the beef’s natural flavors. The longer you dry brine, up to three days, the more pronounced the flavor and the better the sear will be. If you are short on time, even a 24-hour dry brine will make a noticeable difference. Make sure your refrigerator is clean and free of strong odors, as the roast will be exposed.
- When ready to cook the roast, take it out of the refrigerator about an hour beforehand and let it come to room temperature. Bringing the roast to room temperature before cooking is another critical step for even cooking. When a cold roast is placed directly into a hot oven, the outside cooks much faster than the inside. This can lead to an overcooked exterior and an undercooked interior. Allowing the roast to sit at room temperature for about an hour helps to equalize its internal temperature, ensuring that it cooks more evenly throughout. This results in a roast that is perfectly cooked from edge to edge, with no dry or overcooked outer layers. Don’t leave the roast out for longer than two hours at room temperature for food safety reasons. This hour-long rest also allows the dry brine to continue working its magic, further enhancing the flavor of the roast.
- Preheat the oven to 250 degrees F. The low oven temperature of 250 degrees Fahrenheit is key to the “low and slow” cooking method that makes this roast so incredibly tender and juicy. Cooking at a low temperature allows the roast to cook gently and evenly, preventing it from drying out and toughening. This method also allows the connective tissues in the meat to break down slowly, resulting in a melt-in-your-mouth texture. Preheating the oven ensures that it reaches the desired temperature before you place the roast inside, guaranteeing consistent cooking from the start. Use an oven thermometer to verify the accuracy of your oven temperature, as oven temperatures can sometimes vary.
- Using a sharp knife, remove all of the fat and any silver skin from the outside of the meat, and if you have any hard, dry spots from it sitting in the refrigerator trim those off as well. Trimming the roast is an important step for both aesthetics and cooking quality. Excess fat can render unevenly and cause splattering in the oven. Silver skin, a thin, tough membrane found on some cuts of beef, does not break down during cooking and can become chewy and unpleasant. Removing it ensures a more tender and enjoyable eating experience. Any hard, dry spots that may have formed during the dry brining process should also be trimmed off, as these areas can become overly tough during cooking. Use a sharp knife, such as a boning knife or a chef’s knife, to carefully trim away the fat and silver skin. You don’t need to remove all the fat, just the large, thick pieces and the silver skin. Leaving a thin layer of fat will help to keep the roast moist and flavorful.
- Rub the beef with one tablespoon of olive oil and sprinkle the kosher salt and pepper liberally all over it. This is the simple yet effective seasoning for the roast. Rubbing the roast with olive oil helps the salt and pepper adhere evenly and also contributes to browning during searing. Sprinkle the kosher salt and freshly ground black pepper liberally over all sides of the roast, ensuring that every surface is seasoned. Don’t be shy with the seasoning; a 4-pound roast needs a generous amount of salt and pepper to bring out its flavor. Pat the seasoning into the roast to help it adhere. This simple seasoning allows the natural beefy flavor of the New York Strip Roast to shine through, while the salt and pepper enhance and complement it.
- Heat one tablespoon of olive oil in a heavy-duty oven-safe skillet over medium-high heat and when it is almost smoking add the beef. Sear it on the top, bottom, and sides for one to two minutes each, or until each side is nicely browned. Searing the roast in a hot cast iron skillet before oven roasting is another crucial step for developing flavor and texture. Searing creates a beautiful, flavorful crust on the outside of the roast through the Maillard reaction. A cast iron skillet is ideal for searing because it heats evenly and retains heat exceptionally well, allowing you to achieve a deep, even sear. Heat the olive oil in the skillet over medium-high heat until it is shimmering and almost smoking. This indicates that the skillet is hot enough for searing. Carefully place the roast in the hot skillet and sear it on all sides – top, bottom, and ends – for one to two minutes per side, or until each side is nicely browned. You are not trying to cook the roast through at this stage, just to develop a flavorful crust. The searing process should be quick and efficient. Be careful not to overcrowd the skillet, as this can lower the temperature and prevent proper searing. If your roast is too large for your skillet, you may need to sear it in batches.
- Place the pan in the oven and do not cover. Cook the roast until a meat thermometer inserted through in the thickest part registers five to ten degrees below your preferred degree of doneness. For maximum juiciness and flavor, I recommend not cooking this roast well-done. Once the roast is seared, transfer the cast iron skillet directly to the preheated oven. Do not cover the roast, as this will steam it rather than roast it, preventing the crust from becoming crisp and flavorful. Cook the roast in the oven until it reaches your desired internal temperature. The best way to determine doneness is to use an instant-read digital meat thermometer. Insert the thermometer into the thickest part of the roast, avoiding the bone if there is one. Refer to a meat temperature chart for your preferred level of doneness. For medium-rare, aim for 130-135 degrees Fahrenheit before resting. For medium, aim for 135-140 degrees Fahrenheit before resting. Remember that the roast will continue to cook and rise in temperature by about 5-10 degrees Fahrenheit during the resting period. It is crucial not to overcook the New York Strip Roast, as it can become dry and tough. For maximum juiciness and flavor, it is recommended to cook it to medium-rare or medium.
- When the roast comes up to the desired temperature, carefully remove it from the oven using a heavy-duty oven mitt. Tent loosely with foil and allow it to rest for at least 20 minutes before slicing. The temperature of the roast will rise an additional five to ten degrees while it rests. Resting the roast is as important as the cooking process itself. During cooking, the juices in the meat are pushed towards the center. Resting allows these juices to redistribute evenly throughout the roast, resulting in a more tender and flavorful final product. When the roast reaches your desired temperature, carefully remove the cast iron skillet from the oven using oven mitts, as the skillet will be extremely hot. Transfer the roast to a cutting board and tent it loosely with aluminum foil. Do not wrap it tightly, as this will steam the roast and soften the crust. Allow the roast to rest for at least 20 minutes, and even longer is better if time permits. During this resting period, the internal temperature of the roast will continue to rise by about 5-10 degrees Fahrenheit, reaching its final temperature. This carryover cooking is important to consider when determining when to remove the roast from the oven.
- Thinly slice the beef and serve immediately. Once the roast has rested, it is ready to be sliced and served. Use a sharp carving knife to thinly slice the roast against the grain. Slicing against the grain means cutting perpendicular to the muscle fibers, which makes the meat more tender and easier to chew. Serve the sliced roast immediately while it is still warm and juicy. The aroma and flavor of freshly sliced New York Strip Roast are truly irresistible.
Nutrition
- Serving Size: One Normal Portion
- Calories: 192 kcal