")

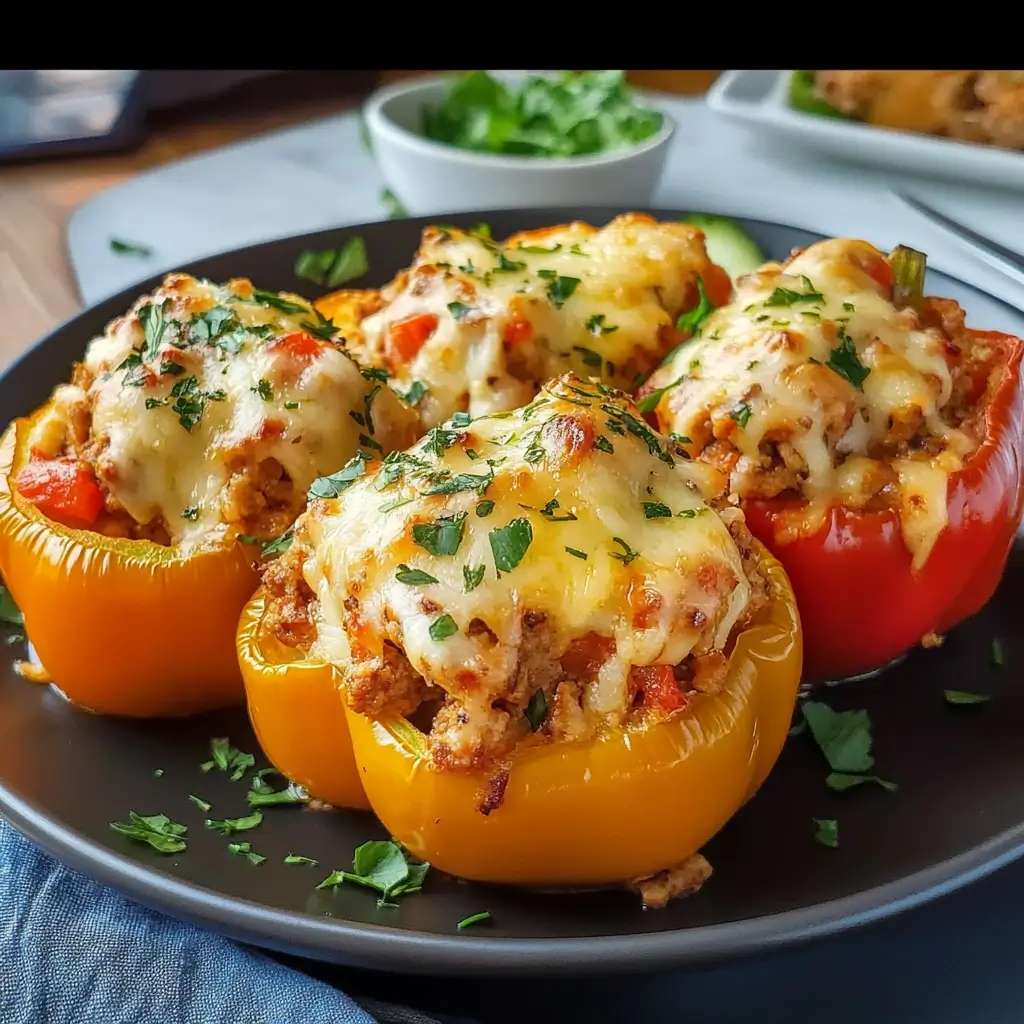

There are some recipes that just feel like a warm hug on a plate, and these Ground Chicken Stuffed Bell Peppers are exactly that for my family. I remember the first time I made them, slightly skeptical if the kids would go for the bell peppers themselves. To my surprise, they devoured them! The savory, perfectly seasoned ground chicken filling, mixed with fluffy rice and tangy tomatoes, all nestled inside a tender, sweet bell pepper shell, was an instant winner. It’s become a regular in our dinner rotation because it’s not only incredibly delicious and satisfying but also relatively easy to assemble, visually appealing, and packed with wholesome ingredients. It feels fancy enough for guests but is practical enough for a weeknight meal. Seeing those colorful pepper halves disappear from plates, knowing everyone’s getting a good dose of veggies and lean protein, is pure dinner-time satisfaction. This recipe isn’t just food; it’s comfort, color, and a guaranteed clean-plate club initiator.
Why Ground Chicken Stuffed Bell Peppers Are a Must-Try
Before diving into the nitty-gritty of the recipe, let’s talk about why this dish deserves a prime spot in your cooking repertoire. Stuffed bell peppers are a classic for a reason, but using ground chicken offers a lighter, leaner twist without sacrificing flavor.
- Healthier Choice: Ground chicken is typically lower in saturated fat compared to ground beef or pork, making it a heart-friendlier option. It’s packed with lean protein, essential for muscle building, satiety, and overall bodily function.
- Flavor Profile: Chicken provides a milder base flavor than red meat, allowing the other ingredients – the spices, tomatoes, herbs, and the sweetness of the bell pepper itself – to really shine through. It creates a beautifully balanced and less heavy final dish.
- Versatility: This recipe is incredibly adaptable. Don’t like rice? Use quinoa or cauliflower rice. Want a different flavor profile? Switch up the spices (think Italian herbs, Mexican spices, or even a curry blend). Add different vegetables to the filling like corn, zucchini, or mushrooms. The possibilities are vast.
- Visually Appealing: Let’s be honest, they look fantastic! The vibrant colors of the bell peppers make for a stunning presentation. Serving these feels a bit special, instantly elevating a simple dinner.
- Balanced Meal: Each pepper half offers a well-rounded mix of protein (chicken), carbohydrates (rice), vegetables (peppers, onions, tomatoes), and healthy fats (depending on additions like cheese or olive oil). It’s a complete meal in one convenient, edible package.
- Meal Prep Friendly: Stuffed peppers are fantastic for making ahead. You can prepare the filling in advance, or even assemble the entire dish and bake it later. They also reheat beautifully, making them perfect for lunches or quick dinners throughout the week.
Choosing the Right Bell Peppers
The star of the show, besides the filling, is the bell pepper itself! Choosing the right ones can significantly impact the final dish:
- Color Matters (Slightly):
- Green: These are technically unripe peppers and have a slightly more bitter, grassy flavor. They hold their shape well during baking.
- Red: Fully ripened, these are the sweetest and have the highest concentration of vitamins A and C. They become very tender and sweet when cooked.
- Yellow & Orange: These fall in between green and red in terms of sweetness and flavor. They offer a beautiful color contrast and a mild sweetness.
- Recommendation: Using a variety of colors makes the dish visually stunning! Red, yellow, and orange peppers tend to complement the savory filling best due to their inherent sweetness, but green peppers work perfectly well if you prefer their flavor or firmness.
- Size and Shape: Look for peppers that are relatively uniform in size and have a blocky shape with a flat bottom (if possible). This helps them sit upright in the baking dish and ensures even cooking. Medium to large peppers (about 6-8 oz each) are ideal for holding a good amount of filling. Avoid peppers that are overly elongated or misshapen, as they can be difficult to fill and may cook unevenly.
- Quality: Choose peppers that are firm, glossy, and free from soft spots, blemishes, or wrinkles. Heavier peppers for their size usually indicate thicker walls, which are better for stuffing.
Ingredients
Here’s what you’ll need to create this delicious meal. Precise measurements ensure the best results, but feel free to adjust seasonings to your taste.
- Bell Peppers: 6 medium-large bell peppers (approx. 6-8 oz each, any color combination)
- Olive Oil: 2 tablespoons, divided
- Ground Chicken: 1.5 pounds (lean ground chicken recommended)
- Yellow Onion: 1 large, finely chopped (about 1.5 cups)
- Garlic: 4 cloves, minced
- Cooked Rice: 1.5 cups (white, brown, or even quinoa work well – cooked according to package directions)
- Diced Tomatoes: 1 can (14.5 oz), undrained (petite diced recommended for better integration)
- Tomato Paste: 2 tablespoons
- Chicken Broth or Water: 1/2 cup (low sodium preferred)
- Italian Seasoning: 1 tablespoon (or a mix of dried oregano, basil, thyme)
- Smoked Paprika: 1 teaspoon (adds a lovely depth)
- Red Pepper Flakes: 1/4 – 1/2 teaspoon (optional, for a touch of heat)
- Salt: 1 teaspoon (adjust to taste)
- Black Pepper: 1/2 teaspoon (freshly ground preferred)
- Fresh Parsley: 1/4 cup, chopped (plus extra for garnish)
- Shredded Cheese: 1 cup (Mozzarella, Monterey Jack, Cheddar, or an Italian blend work well)
Equipment Needed
Having the right tools makes the process smoother:
- Large Skillet or Dutch Oven
- Sharp Knife
- Cutting Board
- Measuring Cups and Spoons
- Large Baking Dish (9×13 inch or similar size that fits peppers snugly)
- Spoon or Ice Cream Scoop (for filling)
- Aluminum Foil
Instructions
Follow these steps for perfectly cooked, flavorful ground chicken stuffed bell peppers:
- Preheat & Prep Peppers: Preheat your oven to 375°F (190°C). Wash the bell peppers thoroughly. Slice them in half lengthwise, from stem to bottom. Remove the seeds and white membranes. You can leave the stems on for presentation or remove them if preferred. Arrange the pepper halves, cut-side up, in a large baking dish. Drizzle them lightly with 1 tablespoon of olive oil and season with a pinch of salt and pepper. Optional Pre-Bake: For softer peppers, you can bake the empty halves for 15 minutes while you prepare the filling. This helps ensure they are fully tender by the time the filling is cooked through.
- Sauté Aromatics: Heat the remaining 1 tablespoon of olive oil in a large skillet or Dutch oven over medium-high heat. Add the finely chopped onion and cook, stirring occasionally, until softened and translucent, about 5-7 minutes.
- Cook Ground Chicken: Add the minced garlic to the skillet and cook for about 1 minute more, until fragrant. Push the onions and garlic to the side and add the ground chicken to the skillet. Break it apart with a spoon and cook, stirring frequently, until it’s browned and cooked through, about 7-10 minutes. Drain off any excess fat/liquid if necessary (though lean ground chicken usually doesn’t produce much).
- Combine Filling Ingredients: Reduce the heat to medium. Stir in the cooked rice, undrained diced tomatoes, tomato paste, chicken broth (or water), Italian seasoning, smoked paprika, optional red pepper flakes, 1 teaspoon of salt, and 1/2 teaspoon of black pepper. Mix everything together thoroughly until well combined.
- Simmer Filling: Bring the mixture to a gentle simmer and cook for 5-7 minutes, allowing the flavors to meld and the sauce to thicken slightly. Stir occasionally.
- Stir in Fresh Herbs: Remove the skillet from the heat. Stir in the 1/4 cup of chopped fresh parsley. Taste the filling and adjust seasonings (salt, pepper, herbs) if needed.
- Stuff the Peppers: Carefully spoon the ground chicken and rice mixture evenly into each bell pepper half. An ice cream scoop can make this process neater. Pack the filling in gently but don’t compress it too tightly. Mound it slightly on top.
- Add Water & Cover: Pour about 1/2 inch of water or additional chicken broth into the bottom of the baking dish (around the peppers, not in them). This creates steam and helps the peppers cook evenly and prevents them from drying out or burning on the bottom. Cover the baking dish tightly with aluminum foil.
- First Bake: Carefully place the covered baking dish into the preheated oven. Bake for 30-40 minutes. The exact time depends on the size of your peppers and whether you pre-baked them. The peppers should be starting to get tender when pierced with a fork.
- Add Cheese & Final Bake: Remove the baking dish from the oven and carefully remove the aluminum foil (watch out for steam!). Sprinkle the shredded cheese evenly over the top of the filling in each pepper half.
- Bake Uncovered: Return the baking dish to the oven, uncovered. Bake for another 10-15 minutes, or until the cheese is melted, bubbly, and lightly golden brown, and the peppers are fully tender.
- Rest & Garnish: Once baked, remove the dish from the oven and let the stuffed peppers rest for 5-10 minutes before serving. This allows the filling to set slightly and makes them easier to handle. Garnish generously with extra chopped fresh parsley before serving.
Nutrition Facts
- Servings: 6 (serving size = 1 stuffed pepper half)
- Calories per serving: Approximately 350-450 kcal (This is an estimate and can vary significantly based on the exact size of peppers, leanness of chicken, type of rice, amount of cheese, and specific brands of ingredients used.)
Disclaimer: The provided nutrition information is an estimate only. For precise nutritional data, it is recommended to use an online calculator with your specific ingredients and measurements.
Preparation Time
- Prep time: 25-30 minutes (chopping vegetables, preparing peppers, mixing filling)
- Cook time: 45-60 minutes (sautéing, baking)
- Total time: Approximately 1 hour 10 minutes to 1 hour 30 minutes
How to Serve
Ground Chicken Stuffed Bell Peppers are hearty enough to be a meal on their own, but they also pair beautifully with various sides. Here are some serving suggestions:
- Simple & Classic: Serve one or two pepper halves directly on a plate. Garnish with fresh parsley or basil.
- With a Side Salad: A light, crisp green salad with a vinaigrette dressing complements the richness of the stuffed peppers perfectly.
- Examples: Arugula salad with lemon vinaigrette, mixed greens with cucumber and tomatoes, Caesar salad (light on the dressing).
- Alongside Roasted Vegetables: Enhance the veggie goodness with a side of roasted broccoli, asparagus, Brussels sprouts, or sweet potato wedges.
- With Crusty Bread: Perfect for soaking up any delicious juices or sauce from the peppers or the bottom of the baking dish. Garlic bread is also a fantastic companion.
- With a Dollop: Add a spoonful of plain Greek yogurt, sour cream, or even a drizzle of pesto on top just before serving for extra creaminess or flavor.
- Grain Bowl Style: Serve a pepper half alongside an extra scoop of plain cooked quinoa or brown rice for those wanting a larger grain portion.
- Buffet Style: Arrange the colorful peppers on a platter for a visually appealing addition to a buffet or potluck spread.
Variations and Customizations
One of the best things about stuffed peppers is their adaptability. Feel free to experiment!
- Low-Carb/Keto: Replace the cooked rice with cauliflower rice (add it raw with the tomatoes and broth, it will cook in the filling) or omit the grain altogether and add more vegetables like chopped mushrooms, zucchini, or spinach to the filling. Ensure your diced tomatoes and paste are low in added sugar.
- Different Grains: Swap the white or brown rice for cooked quinoa, farro, barley, or couscous. Adjust cooking liquid slightly if needed based on the grain’s absorbency.
- Spice It Up:
- Mexican Twist: Use taco seasoning instead of Italian seasoning, add a can of black beans (rinsed and drained) and corn to the filling, and top with Pepper Jack cheese. Serve with salsa and sour cream.
- Mediterranean Flair: Use oregano and mint, add chopped Kalamata olives and feta cheese to the filling (stir feta in at the end or sprinkle on top).
- Curry Infusion: Sauté onions with curry powder and ginger, add coconut milk instead of chicken broth, and stir in peas.
- Add More Veggies: Bulk up the filling by sautéing finely chopped zucchini, mushrooms, carrots, celery, or spinach along with the onions.
- Different Cheeses: Experiment with Gruyere, Fontina, Provolone, Goat Cheese (crumbled on top after baking), or a dairy-free cheese alternative.
- Ground Turkey or Beef: While this recipe highlights chicken, you can easily substitute ground turkey, lean ground beef, or even ground pork. Adjust cooking time slightly if needed and drain fat thoroughly, especially with beef or pork.
- Vegetarian Option: Omit the chicken and use lentils (cooked or canned), crumbled tofu or tempeh, or a mixture of finely chopped mushrooms and walnuts as the protein base. You may need to add extra seasoning or a splash of soy sauce/tamari for umami.
Make-Ahead and Storage Instructions
These peppers are great for planning ahead:
- Make Filling Ahead: Prepare the chicken and rice filling completely (Steps 2-6). Let it cool, then store it in an airtight container in the refrigerator for up to 2 days. When ready to bake, prep the peppers, stuff them with the cold filling, and proceed with baking (Steps 7-12), adding about 10-15 minutes to the initial covered baking time since the filling is cold.
- Assemble Ahead: Assemble the peppers completely (Steps 1-8), stuffing them and placing them in the baking dish with water in the bottom. Cover tightly with plastic wrap or foil and refrigerate for up to 24 hours. Before baking, remove the plastic wrap (if used), cover with foil, and bake as directed, potentially adding 10-15 minutes to the initial covered baking time.
- Storing Leftovers: Store cooked and cooled stuffed peppers in an airtight container in the refrigerator for up to 3-4 days.
- Reheating:
- Oven (Recommended): Place peppers in an oven-safe dish, add a splash of water to the bottom, cover loosely with foil, and reheat in a 350°F (175°C) oven for 15-25 minutes, or until heated through. Remove foil for the last few minutes if you want to re-crisp the cheese.
- Microwave: Place a pepper half on a microwave-safe plate. Cover loosely and microwave on medium-high power for 2-4 minutes, or until heated through. Note that the pepper texture might become softer in the microwave.
- Freezing:
- Cooked: Let the baked stuffed peppers cool completely. You can wrap them individually in plastic wrap and then foil, or place them in a freezer-safe container (single layer if possible, or with parchment paper between layers). Freeze for up to 2-3 months. Thaw overnight in the refrigerator before reheating using the oven method.
- Uncooked (Filling Only): The filling freezes well. Let it cool completely, place it in a freezer-safe bag or container, and freeze for up to 3 months. Thaw in the refrigerator overnight before stuffing freshly prepped peppers and baking as directed. Freezing assembled but uncooked peppers is generally not recommended as the peppers can become very watery upon thawing.
Troubleshooting Common Issues
- Watery Peppers: This can happen if the peppers release a lot of moisture during cooking. Ensure you add only about 1/2 inch of water to the bottom of the pan, not into the peppers. Also, draining the diced tomatoes slightly (reserving the juice to add back if the filling seems too dry) can help. If the final dish seems watery, carefully spoon out some excess liquid before serving.
- Undercooked Peppers: If your peppers are still too firm after the recommended baking time, simply cover the dish loosely with foil again and continue baking in 10-minute increments until they reach your desired tenderness. Pre-baking the empty pepper halves (as mentioned in Step 1) significantly helps prevent this.
- Filling Too Dry: If the filling seems dry before stuffing, add a bit more chicken broth, water, or some reserved juice from the diced tomatoes until it reaches the desired consistency.
- Filling Too Wet: If the filling looks too soupy after simmering, let it simmer uncovered for a few extra minutes, stirring occasionally, to allow more liquid to evaporate before stuffing the peppers.
- Peppers Tipping Over: Choose blocky peppers with flat bottoms. If they still wobble, you can create small “rings” out of aluminum foil to place under them for support, or trim a tiny sliver off the very bottom to create a flat base (be careful not to cut a hole). Packing them snugly in the baking dish also helps.
Additional Tips for Success
- Don’t Overcook the Chicken: When initially browning the ground chicken, cook it just until it’s no longer pink. It will continue to cook in the filling and during baking, so overcooking at the start can make it dry.
- Taste and Adjust Seasoning: The key to a delicious filling is balanced seasoning. Taste the filling mixture before stuffing the peppers and adjust salt, pepper, herbs, or spice level according to your preference. Remember that the pepper itself will add a subtle sweetness.
- Uniform Pepper Halves: Try to cut the peppers as evenly in half as possible. This ensures they cook at roughly the same rate and hold a similar amount of filling.
- Resting is Key: Don’t skip the 5-10 minute resting period after baking. It allows the intense heat to subside slightly, the juices in the filling to redistribute, and makes the peppers easier and safer to serve.
- Don’t Crowd the Pan: Ensure the peppers fit snugly but aren’t overly squashed in the baking dish. Proper airflow around them contributes to even cooking. If necessary, use two smaller baking dishes instead of one large one.
Frequently Asked Questions (FAQ)
- Q: Can I use different ground meat instead of chicken?
- A: Absolutely! Ground turkey is a very common and easy substitute, offering a similar lean profile. Lean ground beef (90/10 or leaner) or ground pork also work wonderfully. Simply follow the same instructions, ensuring you drain any excess fat after browning the meat, especially with beef or pork. The flavor profile will change accordingly.
- Q: Can I make these stuffed peppers without rice?
- A: Yes, definitely. For a lower-carb version, substitute the cooked rice with an equal amount of raw cauliflower rice (it will cook sufficiently during the simmering and baking stages). Alternatively, you can omit the grain entirely and increase the amount of ground chicken or add other finely chopped vegetables like mushrooms, zucchini, or spinach to make the filling substantial.
- Q: How do I prevent the bell peppers from becoming soggy?
- A: Several things help: 1) Don’t add too much water to the bottom of the baking dish (1/2 inch is usually sufficient). 2) Consider slightly under-draining the diced tomatoes or using crushed tomatoes for less liquid. 3) Avoid over-baking; cook until tender-crisp rather than mushy. 4) The optional pre-baking step can sometimes help firm up the pepper structure slightly before filling.
- Q: What type of cheese melts best on top?
- A: Low-moisture, part-skim mozzarella is a classic choice known for its excellent melting and mild flavor. Monterey Jack, Colby, mild or sharp Cheddar, Provolone, or an Italian blend (often containing mozzarella, provolone, parmesan, etc.) all melt beautifully and add great flavor. Choose based on your preference! For a sharper bite, cheddar is great; for stretchy pull, mozzarella is key.
- Q: Can I freeze stuffed peppers before baking them?
- A: While you can, it’s generally not the recommended method. Raw bell peppers contain a lot of water, and freezing them raw, then thawing and baking can lead to a very soft, watery, and sometimes mushy texture. It’s much better to either freeze the cooked filling separately or freeze the fully baked and cooled stuffed peppers. If freezing cooked peppers, thaw them in the refrigerator overnight before reheating in the oven for the best results.

Ground Chicken Stuffed Bell Peppers Recipe
Ingredients
- Bell Peppers: 6 medium-large bell peppers (approx. 6-8 oz each, any color combination)
- Olive Oil: 2 tablespoons, divided
- Ground Chicken: 1.5 pounds (lean ground chicken recommended)
- Yellow Onion: 1 large, finely chopped (about 1.5 cups)
- Garlic: 4 cloves, minced
- Cooked Rice: 1.5 cups (white, brown, or even quinoa work well – cooked according to package directions)
- Diced Tomatoes: 1 can (14.5 oz), undrained (petite diced recommended for better integration)
- Tomato Paste: 2 tablespoons
- Chicken Broth or Water: 1/2 cup (low sodium preferred)
- Italian Seasoning: 1 tablespoon (or a mix of dried oregano, basil, thyme)
- Smoked Paprika: 1 teaspoon (adds a lovely depth)
- Red Pepper Flakes: 1/4 – 1/2 teaspoon (optional, for a touch of heat)
- Salt: 1 teaspoon (adjust to taste)
- Black Pepper: 1/2 teaspoon (freshly ground preferred)
- Fresh Parsley: 1/4 cup, chopped (plus extra for garnish)
- Shredded Cheese: 1 cup (Mozzarella, Monterey Jack, Cheddar, or an Italian blend work well)
Instructions
- Preheat & Prep Peppers: Preheat your oven to 375°F (190°C). Wash the bell peppers thoroughly. Slice them in half lengthwise, from stem to bottom. Remove the seeds and white membranes. You can leave the stems on for presentation or remove them if preferred. Arrange the pepper halves, cut-side up, in a large baking dish. Drizzle them lightly with 1 tablespoon of olive oil and season with a pinch of salt and pepper. Optional Pre-Bake: For softer peppers, you can bake the empty halves for 15 minutes while you prepare the filling. This helps ensure they are fully tender by the time the filling is cooked through.
- Sauté Aromatics: Heat the remaining 1 tablespoon of olive oil in a large skillet or Dutch oven over medium-high heat. Add the finely chopped onion and cook, stirring occasionally, until softened and translucent, about 5-7 minutes.
- Cook Ground Chicken: Add the minced garlic to the skillet and cook for about 1 minute more, until fragrant. Push the onions and garlic to the side and add the ground chicken to the skillet. Break it apart with a spoon and cook, stirring frequently, until it’s browned and cooked through, about 7-10 minutes. Drain off any excess fat/liquid if necessary (though lean ground chicken usually doesn’t produce much).
- Combine Filling Ingredients: Reduce the heat to medium. Stir in the cooked rice, undrained diced tomatoes, tomato paste, chicken broth (or water), Italian seasoning, smoked paprika, optional red pepper flakes, 1 teaspoon of salt, and 1/2 teaspoon of black pepper. Mix everything together thoroughly until well combined.
- Simmer Filling: Bring the mixture to a gentle simmer and cook for 5-7 minutes, allowing the flavors to meld and the sauce to thicken slightly. Stir occasionally.
- Stir in Fresh Herbs: Remove the skillet from the heat. Stir in the 1/4 cup of chopped fresh parsley. Taste the filling and adjust seasonings (salt, pepper, herbs) if needed.
- Stuff the Peppers: Carefully spoon the ground chicken and rice mixture evenly into each bell pepper half. An ice cream scoop can make this process neater. Pack the filling in gently but don’t compress it too tightly. Mound it slightly on top.
- Add Water & Cover: Pour about 1/2 inch of water or additional chicken broth into the bottom of the baking dish (around the peppers, not in them). This creates steam and helps the peppers cook evenly and prevents them from drying out or burning on the bottom. Cover the baking dish tightly with aluminum foil.
- First Bake: Carefully place the covered baking dish into the preheated oven. Bake for 30-40 minutes. The exact time depends on the size of your peppers and whether you pre-baked them. The peppers should be starting to get tender when pierced with a fork.
- Add Cheese & Final Bake: Remove the baking dish from the oven and carefully remove the aluminum foil (watch out for steam!). Sprinkle the shredded cheese evenly over the top of the filling in each pepper half.
- Bake Uncovered: Return the baking dish to the oven, uncovered. Bake for another 10-15 minutes, or until the cheese is melted, bubbly, and lightly golden brown, and the peppers are fully tender.
- Rest & Garnish: Once baked, remove the dish from the oven and let the stuffed peppers rest for 5-10 minutes before serving. This allows the filling to set slightly and makes them easier to handle. Garnish generously with extra chopped fresh parsley before serving.
Nutrition
- Serving Size: One Normal Portion
- Calories: 350-450 kcal