")


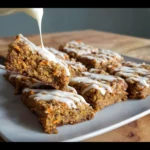
It’s no secret that zucchini bread is a beloved classic, especially when summer gardens overflow with this versatile vegetable. But let’s be honest, not all zucchini breads are created equal. Some are dry, some are bland, and some just lack that certain something. That’s why when I stumbled upon this recipe for Fan-Favorite Chocolate Zucchini Bread, I was intrigued, but also a little skeptical. Could it truly live up to the “fan-favorite” title? Let me tell you, after just one bite, all skepticism vanished. This isn’t just good zucchini bread; it’s exceptional. The moistness is out of this world – almost fudge-like as the description boasts. And the double dose of chocolate? Pure genius. My family, even the zucchini-averse members, devoured this loaf in record time. It’s become a regular request, a staple in our summer baking rotation, and honestly, it’s a treat I look forward to making and sharing. If you’re searching for a chocolate zucchini bread recipe that’s guaranteed to be a hit, look no further. This is it.
Ingredients
This recipe utilizes simple, pantry-staple ingredients, making it incredibly accessible for bakers of all levels. Let’s break down each component and understand its role in creating this delectable loaf.
- 1 cup (125g) all-purpose flour (spooned & leveled): Flour is the structural backbone of our bread, providing the necessary framework. The “spooned and leveled” instruction is crucial for accurate measurement. Scooping flour directly from the bag can compact it, leading to too much flour in the recipe and a drier, denser bread. Spoon the flour into your measuring cup and then level off the excess with a straight edge, like the back of a knife. Using all-purpose flour ensures a tender and slightly chewy texture, perfect for zucchini bread.
- 1/2 cup (41g) unsweetened natural cocoa powder (not Dutch process): Cocoa powder is the first layer of chocolatey goodness in this double chocolate bread. Unsweetened natural cocoa powder has a more intense, slightly bitter chocolate flavor and a lighter color compared to Dutch-processed cocoa. Natural cocoa powder is also acidic, which reacts with baking soda to help the bread rise. While Dutch-processed cocoa powder, which is less acidic, can be used in a pinch, the flavor and rise might be slightly different. For the best results, stick with natural cocoa powder.
- 3/4 teaspoon baking soda: Baking soda is a chemical leavening agent. When combined with an acid (in this case, cocoa powder and yogurt/sour cream) and moisture, it produces carbon dioxide gas, which creates air bubbles in the batter and makes the bread rise. Using the correct amount of baking soda is essential for a light and airy texture. Too much can result in a soapy taste, while too little might lead to a dense bread.
- 1/4 teaspoon baking powder: Baking powder is another leavening agent, but it’s a double-acting one, meaning it leavens in two stages: once when it’s mixed with liquid and again when it’s heated in the oven. It provides an extra boost of rise and ensures a tender crumb. While baking soda is the primary leavening agent in this recipe, baking powder works in tandem to create the perfect texture.
- 1/4 teaspoon salt: Salt might seem like a minor ingredient in a sweet bread, but it plays a vital role in flavor enhancement. Salt balances the sweetness, intensifies the chocolate flavor, and also helps to control the yeast activity (in yeast breads, but also important in chemical leavening to prevent off-flavors). Don’t skip the salt!
- 1/2 teaspoon espresso powder: Espresso powder is a secret weapon in chocolate baking. It doesn’t make the bread taste like coffee, but instead, it deepens and intensifies the chocolate flavor. The subtle bitterness of espresso powder complements the sweetness of the chocolate and sugar, creating a more complex and richer taste profile. If you don’t have espresso powder, you can omit it, but it really elevates the chocolate flavor. Instant coffee granules can be used as a substitute if needed.
- 3/4 cup (135g) semi-sweet chocolate chips: Here comes the second dose of chocolate! Semi-sweet chocolate chips add melty pockets of chocolate throughout the bread and contribute to the overall chocolate richness. Semi-sweet chips strike a good balance between sweetness and bitterness, complementing the cocoa powder perfectly. You can also use dark chocolate chips for a less sweet and more intense chocolate flavor, or milk chocolate chips for a sweeter, milder taste. Mini chocolate chips can also be used for more even chocolate distribution.
- 2 large eggs: Eggs are essential for binding the ingredients together, adding moisture, richness, and structure to the bread. They contribute to the tender crumb and help create a cohesive batter. Large eggs are the standard size used in most baking recipes.
- 1/4 cup (60ml) vegetable oil or melted coconut oil: Oil is the fat component in this recipe, contributing to the moist and tender texture of the bread. Vegetable oil is a neutral-flavored oil that won’t interfere with the chocolate flavor. Melted coconut oil adds a subtle coconut aroma and flavor, which can be a nice complement to chocolate. You can also use other neutral oils like canola oil or grapeseed oil. Avoid strongly flavored oils like olive oil, which might clash with the chocolate and zucchini.
- 1/3 cup (80g) plain Greek yogurt or sour cream: Greek yogurt or sour cream adds moisture and tanginess to the bread. The acidity in these ingredients also reacts with the baking soda, contributing to leavening and a tender crumb. Plain Greek yogurt is a slightly healthier option, adding protein and less fat than sour cream. Both work wonderfully in this recipe. Full-fat or low-fat versions can be used; full-fat will result in a slightly richer bread.
- 2/3 cup (135g) granulated sugar: Granulated sugar adds sweetness, moisture, and tenderness to the bread. It also helps with browning during baking. Granulated sugar is the standard white sugar used in baking. You can slightly reduce the amount of sugar if you prefer a less sweet bread, but keep in mind that sugar contributes to the overall texture and moisture as well.
- 1 teaspoon pure vanilla extract: Vanilla extract enhances the overall flavor profile of the bread, bringing out the sweetness and chocolate notes. Pure vanilla extract is preferred for its rich and authentic vanilla flavor. Imitation vanilla extract can be used, but the flavor won’t be as pronounced.
- 1 and 1/2 cups (180g) shredded zucchini (no need to blot): Zucchini is the star ingredient, adding moisture, tenderness, and a subtle sweetness to the bread. The beauty of zucchini in baking is that it practically disappears into the batter, adding moisture and nutrients without a strong vegetable flavor. There’s no need to blot the zucchini, which is a fantastic time-saver. The moisture from the zucchini is actually desirable for keeping the bread incredibly moist. Simply shred the zucchini using a box grater and measure it lightly packed.
Instructions
Baking this Fan-Favorite Chocolate Zucchini Bread is surprisingly straightforward and doesn’t require any fancy equipment. Follow these step-by-step instructions for baking success:
- Preheat oven to 350°F (177°C). Grease a 9×5-inch loaf pan or 8×4-inch loaf pan (for a taller loaf) with nonstick spray. Set aside.
- Start by preheating your oven to the specified temperature. Accurate oven temperature is crucial for even baking. While the oven preheats, prepare your loaf pan. Greasing the pan thoroughly with nonstick spray (or butter and flour) ensures that the bread releases easily after baking without sticking. Using a 9×5-inch loaf pan will result in a wider, slightly shorter loaf, while an 8×4-inch loaf pan will yield a taller, more compact loaf. Choose based on your preference.
- In a large bowl, whisk the flour, cocoa powder, baking soda, baking powder, salt, and espresso powder together until combined. Mix in the chocolate chips. Set aside.
- This step involves combining all the dry ingredients. Whisking them together is important because it aerates the flour, removes any lumps, and ensures that the leavening agents (baking soda and baking powder), salt, cocoa powder, and espresso powder are evenly distributed throughout the flour. This even distribution is key for consistent flavor and texture throughout the baked bread. After whisking, gently fold in the chocolate chips. Coating them lightly with the flour mixture can help prevent them from sinking to the bottom of the loaf during baking.
- In a medium bowl, whisk the eggs, oil, yogurt, granulated sugar, and vanilla together until combined. Slowly pour the wet ingredients into the dry ingredients and gently whisk to combine. Fold in the zucchini. The batter is very thick.
- In a separate bowl, combine all the wet ingredients: eggs, oil, yogurt, sugar, and vanilla extract. Whisk them together until they are well combined and the sugar is mostly dissolved. Pouring the wet ingredients slowly into the dry ingredients and gently whisking is important to prevent overmixing. Overmixing can develop the gluten in the flour, resulting in a tougher bread. Whisk just until the dry ingredients are moistened and there are no large streaks of flour remaining. The batter will be thick, which is perfectly normal for zucchini bread due to the moisture from the zucchini. Finally, gently fold in the shredded zucchini until it’s evenly distributed throughout the batter. Folding is a gentle mixing technique that helps to incorporate ingredients without deflating the batter or overdeveloping the gluten.
- Bake for 45–55 minutes, making sure to loosely cover the bread with aluminum foil halfway through to prevent the top from over-cooking. The bread is done when a toothpick inserted in the center comes out clean with only a few small moist crumbs. The 9×5-inch pan takes closer to 45 minutes, and the 8×4-inch pan takes closer to 55 minutes. All ovens vary, so begin checking around the 45-minute mark.
- Pour the thick batter into your prepared loaf pan and spread it evenly. Place the pan in the preheated oven and bake for the specified time. To prevent the top of the bread from browning too quickly or becoming dry while the inside is still baking, loosely cover the loaf pan with aluminum foil halfway through the baking time, typically around 20-25 minutes. Baking times are estimates and can vary depending on your oven. Start checking for doneness around the 45-minute mark. The best way to check if the bread is done is to insert a toothpick or a thin skewer into the center of the loaf. If it comes out clean with only a few small moist crumbs clinging to it, the bread is done. If it comes out with wet batter, bake for a few more minutes and check again. Avoid overbaking, as this can lead to a dry bread.
- Remove bread from the oven and allow the bread to cool in the pan set on a wire rack for 1 hour. While it’s still warm, I gently press a few more chocolate chips into the top; this is optional and only for looks.
- Once the bread is baked, remove it from the oven and let it cool in the loaf pan for at least 1 hour. Cooling in the pan allows the bread to set properly and prevents it from crumbling when you try to remove it. Placing the pan on a wire rack allows air to circulate around the pan, promoting even cooling. Adding extra chocolate chips to the top while the bread is still warm is an optional step for visual appeal. The warmth of the bread will gently melt the chips, creating a glossy and enticing finish.
- Remove bread from the pan and place the loaf directly on the wire rack to cool completely.
- After cooling in the pan for an hour, carefully remove the bread from the loaf pan and place it directly on the wire rack to cool completely. This allows the bottom and sides of the bread to cool evenly, preventing condensation and ensuring a crisp crust. Resist the temptation to slice into the bread while it’s still warm. Allowing it to cool completely will improve the texture and make it easier to slice neatly.
- Cover and store bread at room temperature for 5 days or in the refrigerator for up to 1 week.
- Once the bread is completely cooled, store it properly to maintain its freshness and moistness. Store the bread at room temperature in an airtight container for up to 5 days. For longer storage, you can refrigerate it in an airtight container for up to 1 week. Refrigerating the bread can make it slightly denser, so you might want to let it come to room temperature before serving.
Nutrition Facts
(Please note: Nutritional information is an estimate and can vary based on specific ingredients and brands used.)
- Servings: 10 slices (per loaf)
- Calories per serving (estimated): Approximately 280-320 calories
This estimate is based on standard ingredient values and is intended as a general guideline. Actual calorie count may vary.
Preparation Time
- Prep Time: 15 minutes
- Cook Time: 50 minutes
- Total Time: 2 hours (includes cooling time)
This recipe is wonderfully efficient in terms of active preparation time. Most of the total time is hands-off, allowing the oven to do its magic and the bread to cool properly.
How to Serve
This Fan-Favorite Chocolate Zucchini Bread is incredibly versatile and can be enjoyed in countless ways. Here are some delicious serving suggestions:
- Warm with Butter: A classic and simple way to enjoy this bread. Slice a piece while it’s still slightly warm and spread with a pat of butter. The butter melts beautifully into the moist crumb, enhancing the richness and flavor.
- Toasted with Cream Cheese: For a slightly more decadent treat, toast a slice of the bread and spread with cream cheese. The tanginess of the cream cheese complements the sweetness of the chocolate and zucchini perfectly.
- With a Scoop of Ice Cream: Turn dessert up a notch by serving a slice of warm chocolate zucchini bread with a scoop of your favorite ice cream. Vanilla, chocolate, or even coffee ice cream would be fantastic pairings.
- As a Snack or Breakfast: This bread is delicious any time of day. Enjoy a slice as a satisfying afternoon snack or a slightly indulgent breakfast treat alongside a cup of coffee or tea.
- Drizzled with Chocolate Ganache: For an extra layer of chocolate indulgence, drizzle a simple chocolate ganache over the cooled bread. Melt chocolate chips with a bit of heavy cream or milk for a quick and easy ganache.
- Alongside Fresh Berries: The richness of the chocolate bread is beautifully balanced by the tartness of fresh berries like raspberries, strawberries, or blueberries. Serve a slice with a side of mixed berries for a delightful and refreshing combination.
- In a Bread Pudding: If you happen to have any leftover bread (though it’s unlikely!), cubed chocolate zucchini bread makes an incredible base for a decadent bread pudding.
Additional Tips for Baking Perfection
To ensure your chocolate zucchini bread turns out perfectly moist, flavorful, and irresistible every time, consider these helpful tips:
- Don’t Overmix the Batter: Overmixing the batter can develop the gluten in the flour, leading to a tough and dense bread. Mix the wet and dry ingredients just until they are combined and no large streaks of flour remain. It’s okay if the batter is slightly lumpy. Gentle mixing is key for a tender crumb.
- Measure Ingredients Accurately: Baking is a science, and accurate measurements are essential for consistent results. Use measuring cups and spoons specifically designed for baking. For dry ingredients like flour, use the “spoon and level” method to avoid packing too much flour into the cup. For liquid ingredients, use liquid measuring cups and measure at eye level.
- Use Fresh Baking Soda and Baking Powder: Baking soda and baking powder are leavening agents that lose their potency over time. Ensure your baking soda and baking powder are fresh for the best rise and texture. You can test baking powder by placing a teaspoon in hot water; it should bubble vigorously. You can test baking soda by mixing a teaspoon with vinegar; it should also bubble.
- Don’t Overbake: Overbaking is a common mistake that can lead to dry bread. Start checking for doneness around the 45-minute mark using a toothpick inserted into the center. The bread is done when the toothpick comes out clean with only a few moist crumbs. Remove the bread from the oven as soon as it’s done to prevent it from drying out.
- Let it Cool Completely (Almost): While it’s tempting to slice into warm bread immediately, allowing it to cool in the pan for at least an hour and then completely on a wire rack is crucial. Cooling allows the bread to set properly, making it easier to slice and preventing it from crumbling. However, a slightly warm slice is heavenly with butter, so a little patience goes a long way, but a small warm slice is a baker’s perk!
Frequently Asked Questions (FAQ)
Have questions about making this delicious chocolate zucchini bread? Here are answers to some common queries:
Q: Can I use Dutch-processed cocoa powder instead of natural cocoa powder?
A: While you can use Dutch-processed cocoa powder, natural cocoa powder is recommended for this recipe. Natural cocoa powder is acidic, which reacts with the baking soda for leavening and flavor. Dutch-processed cocoa powder is less acidic and may result in a slightly less rise and a milder chocolate flavor. If you do use Dutch-processed cocoa, you might consider adding a pinch of cream of tartar (about 1/8 teaspoon) to provide a bit of acidity for the baking soda to react with.
Q: Can I use different types of chocolate chips?
A: Absolutely! Feel free to experiment with different types of chocolate chips to customize your bread. Semi-sweet chocolate chips are called for in the recipe for a balanced sweetness, but you can use dark chocolate chips for a richer, less sweet flavor, milk chocolate chips for a sweeter, milder taste, or even white chocolate chips for a different twist. You can also use a combination of different types of chocolate chips.
Q: Can I add nuts or other mix-ins to the bread?
A: Yes, you can definitely add nuts or other mix-ins to this chocolate zucchini bread to enhance the flavor and texture. Chopped walnuts, pecans, or almonds would be delicious additions. You could also add dried fruits like raisins or cranberries, or even a swirl of peanut butter batter for a peanut butter chocolate zucchini bread variation. About 1/2 to 3/4 cup of mix-ins would be a good starting point. Add them along with the chocolate chips in step 2.
Q: Can I make muffins instead of a loaf?
A: Yes, this recipe can easily be adapted to make muffins. Simply divide the batter evenly among lined muffin cups, filling each about 2/3 full. Bake at 350°F (177°C) for approximately 18-22 minutes, or until a toothpick inserted into the center of a muffin comes out clean. Muffins will bake faster than a loaf, so keep an eye on them.
Q: How do I store leftover chocolate zucchini bread?
A: To keep your chocolate zucchini bread fresh and moist, store it in an airtight container at room temperature for up to 5 days or in the refrigerator for up to 1 week. Refrigeration will extend its shelf life, but the bread may become slightly denser. You can also freeze slices or the entire loaf for longer storage. Wrap tightly in plastic wrap and then in foil or place in a freezer-safe bag. Frozen bread can be thawed at room temperature or gently warmed in the oven or microwave.
Print
Double Chocolate Zucchini Bread Recipe
Ingredients
- 1 cup (125g) all-purpose flour (spooned & leveled): Flour is the structural backbone of our bread, providing the necessary framework. The “spooned and leveled” instruction is crucial for accurate measurement. Scooping flour directly from the bag can compact it, leading to too much flour in the recipe and a drier, denser bread. Spoon the flour into your measuring cup and then level off the excess with a straight edge, like the back of a knife. Using all-purpose flour ensures a tender and slightly chewy texture, perfect for zucchini bread.
- 1/2 cup (41g) unsweetened natural cocoa powder (not Dutch process): Cocoa powder is the first layer of chocolatey goodness in this double chocolate bread. Unsweetened natural cocoa powder has a more intense, slightly bitter chocolate flavor and a lighter color compared to Dutch-processed cocoa. Natural cocoa powder is also acidic, which reacts with baking soda to help the bread rise. While Dutch-processed cocoa powder, which is less acidic, can be used in a pinch, the flavor and rise might be slightly different. For the best results, stick with natural cocoa powder.
- 3/4 teaspoon baking soda: Baking soda is a chemical leavening agent. When combined with an acid (in this case, cocoa powder and yogurt/sour cream) and moisture, it produces carbon dioxide gas, which creates air bubbles in the batter and makes the bread rise. Using the correct amount of baking soda is essential for a light and airy texture. Too much can result in a soapy taste, while too little might lead to a dense bread.
- 1/4 teaspoon baking powder: Baking powder is another leavening agent, but it’s a double-acting one, meaning it leavens in two stages: once when it’s mixed with liquid and again when it’s heated in the oven. It provides an extra boost of rise and ensures a tender crumb. While baking soda is the primary leavening agent in this recipe, baking powder works in tandem to create the perfect texture.
- 1/4 teaspoon salt: Salt might seem like a minor ingredient in a sweet bread, but it plays a vital role in flavor enhancement. Salt balances the sweetness, intensifies the chocolate flavor, and also helps to control the yeast activity (in yeast breads, but also important in chemical leavening to prevent off-flavors). Don’t skip the salt!
- 1/2 teaspoon espresso powder: Espresso powder is a secret weapon in chocolate baking. It doesn’t make the bread taste like coffee, but instead, it deepens and intensifies the chocolate flavor. The subtle bitterness of espresso powder complements the sweetness of the chocolate and sugar, creating a more complex and richer taste profile. If you don’t have espresso powder, you can omit it, but it really elevates the chocolate flavor. Instant coffee granules can be used as a substitute if needed.
- 3/4 cup (135g) semi-sweet chocolate chips: Here comes the second dose of chocolate! Semi-sweet chocolate chips add melty pockets of chocolate throughout the bread and contribute to the overall chocolate richness. Semi-sweet chips strike a good balance between sweetness and bitterness, complementing the cocoa powder perfectly. You can also use dark chocolate chips for a less sweet and more intense chocolate flavor, or milk chocolate chips for a sweeter, milder taste. Mini chocolate chips can also be used for more even chocolate distribution.
- 2 large eggs: Eggs are essential for binding the ingredients together, adding moisture, richness, and structure to the bread. They contribute to the tender crumb and help create a cohesive batter. Large eggs are the standard size used in most baking recipes.
- 1/4 cup (60ml) vegetable oil or melted coconut oil: Oil is the fat component in this recipe, contributing to the moist and tender texture of the bread. Vegetable oil is a neutral-flavored oil that won’t interfere with the chocolate flavor. Melted coconut oil adds a subtle coconut aroma and flavor, which can be a nice complement to chocolate. You can also use other neutral oils like canola oil or grapeseed oil. Avoid strongly flavored oils like olive oil, which might clash with the chocolate and zucchini.
- 1/3 cup (80g) plain Greek yogurt or sour cream: Greek yogurt or sour cream adds moisture and tanginess to the bread. The acidity in these ingredients also reacts with the baking soda, contributing to leavening and a tender crumb. Plain Greek yogurt is a slightly healthier option, adding protein and less fat than sour cream. Both work wonderfully in this recipe. Full-fat or low-fat versions can be used; full-fat will result in a slightly richer bread.
- 2/3 cup (135g) granulated sugar: Granulated sugar adds sweetness, moisture, and tenderness to the bread. It also helps with browning during baking. Granulated sugar is the standard white sugar used in baking. You can slightly reduce the amount of sugar if you prefer a less sweet bread, but keep in mind that sugar contributes to the overall texture and moisture as well.
- 1 teaspoon pure vanilla extract: Vanilla extract enhances the overall flavor profile of the bread, bringing out the sweetness and chocolate notes. Pure vanilla extract is preferred for its rich and authentic vanilla flavor. Imitation vanilla extract can be used, but the flavor won’t be as pronounced.
- 1 and 1/2 cups (180g) shredded zucchini (no need to blot): Zucchini is the star ingredient, adding moisture, tenderness, and a subtle sweetness to the bread. The beauty of zucchini in baking is that it practically disappears into the batter, adding moisture and nutrients without a strong vegetable flavor. There’s no need to blot the zucchini, which is a fantastic time-saver. The moisture from the zucchini is actually desirable for keeping the bread incredibly moist. Simply shred the zucchini using a box grater and measure it lightly packed.
Instructions
- Preheat oven to 350°F (177°C). Grease a 9×5-inch loaf pan or 8×4-inch loaf pan (for a taller loaf) with nonstick spray. Set aside.
- Start by preheating your oven to the specified temperature. Accurate oven temperature is crucial for even baking. While the oven preheats, prepare your loaf pan. Greasing the pan thoroughly with nonstick spray (or butter and flour) ensures that the bread releases easily after baking without sticking. Using a 9×5-inch loaf pan will result in a wider, slightly shorter loaf, while an 8×4-inch loaf pan will yield a taller, more compact loaf. Choose based on your preference.
- In a large bowl, whisk the flour, cocoa powder, baking soda, baking powder, salt, and espresso powder together until combined. Mix in the chocolate chips. Set aside.
- This step involves combining all the dry ingredients. Whisking them together is important because it aerates the flour, removes any lumps, and ensures that the leavening agents (baking soda and baking powder), salt, cocoa powder, and espresso powder are evenly distributed throughout the flour. This even distribution is key for consistent flavor and texture throughout the baked bread. After whisking, gently fold in the chocolate chips. Coating them lightly with the flour mixture can help prevent them from sinking to the bottom of the loaf during baking.
- In a medium bowl, whisk the eggs, oil, yogurt, granulated sugar, and vanilla together until combined. Slowly pour the wet ingredients into the dry ingredients and gently whisk to combine. Fold in the zucchini. The batter is very thick.
- In a separate bowl, combine all the wet ingredients: eggs, oil, yogurt, sugar, and vanilla extract. Whisk them together until they are well combined and the sugar is mostly dissolved. Pouring the wet ingredients slowly into the dry ingredients and gently whisking is important to prevent overmixing. Overmixing can develop the gluten in the flour, resulting in a tougher bread. Whisk just until the dry ingredients are moistened and there are no large streaks of flour remaining. The batter will be thick, which is perfectly normal for zucchini bread due to the moisture from the zucchini. Finally, gently fold in the shredded zucchini until it’s evenly distributed throughout the batter. Folding is a gentle mixing technique that helps to incorporate ingredients without deflating the batter or overdeveloping the gluten.
- Bake for 45–55 minutes, making sure to loosely cover the bread with aluminum foil halfway through to prevent the top from over-cooking. The bread is done when a toothpick inserted in the center comes out clean with only a few small moist crumbs. The 9×5-inch pan takes closer to 45 minutes, and the 8×4-inch pan takes closer to 55 minutes. All ovens vary, so begin checking around the 45-minute mark.
- Pour the thick batter into your prepared loaf pan and spread it evenly. Place the pan in the preheated oven and bake for the specified time. To prevent the top of the bread from browning too quickly or becoming dry while the inside is still baking, loosely cover the loaf pan with aluminum foil halfway through the baking time, typically around 20-25 minutes. Baking times are estimates and can vary depending on your oven. Start checking for doneness around the 45-minute mark. The best way to check if the bread is done is to insert a toothpick or a thin skewer into the center of the loaf. If it comes out clean with only a few small moist crumbs clinging to it, the bread is done. If it comes out with wet batter, bake for a few more minutes and check again. Avoid overbaking, as this can lead to a dry bread.
- Remove bread from the oven and allow the bread to cool in the pan set on a wire rack for 1 hour. While it’s still warm, I gently press a few more chocolate chips into the top; this is optional and only for looks.
- Once the bread is baked, remove it from the oven and let it cool in the loaf pan for at least 1 hour. Cooling in the pan allows the bread to set properly and prevents it from crumbling when you try to remove it. Placing the pan on a wire rack allows air to circulate around the pan, promoting even cooling. Adding extra chocolate chips to the top while the bread is still warm is an optional step for visual appeal. The warmth of the bread will gently melt the chips, creating a glossy and enticing finish.
- Remove bread from the pan and place the loaf directly on the wire rack to cool completely.
- After cooling in the pan for an hour, carefully remove the bread from the loaf pan and place it directly on the wire rack to cool completely. This allows the bottom and sides of the bread to cool evenly, preventing condensation and ensuring a crisp crust. Resist the temptation to slice into the bread while it’s still warm. Allowing it to cool completely will improve the texture and make it easier to slice neatly.
- Cover and store bread at room temperature for 5 days or in the refrigerator for up to 1 week.
- Once the bread is completely cooled, store it properly to maintain its freshness and moistness. Store the bread at room temperature in an airtight container for up to 5 days. For longer storage, you can refrigerate it in an airtight container for up to 1 week. Refrigerating the bread can make it slightly denser, so you might want to let it come to room temperature before serving.
Nutrition
- Serving Size: One Normal Portion
- Calories: 280-320