")


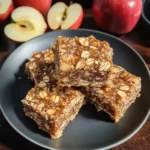
The first time I made these Apple Oat Date Bars, my kitchen instantly filled with the most comforting aroma imaginable – warm apples, sweet dates, toasted oats, and a whisper of cinnamon. It was one of those dreary autumn afternoons, and I needed something wholesome and satisfying, a treat that felt both indulgent and nourishing. When my family came home, drawn by the scent, the bars disappeared from the cooling rack faster than I could have imagined. My kids, usually picky about anything remotely “healthy,” declared them “apple crumble cookies,” and my husband, a man of few words when it comes to sweets, simply asked if there were more. Since then, they’ve become a staple in our house – perfect for lunchboxes, after-school snacks, a quick breakfast bite, or even a simple dessert warmed up with a dollop of yogurt. They strike that perfect balance: a chewy, buttery oat base and crumble topping sandwiching a naturally sweet, gooey filling of tender apples and caramel-like dates. They are surprisingly simple to make, relying on pantry staples and the natural sweetness of fruit, making them a winner for bakers of all levels looking for a healthier treat that doesn’t compromise on flavour. This recipe is my go-to for using up apples and satisfying sweet cravings the wholesome way.
Ingredients
This recipe yields incredibly flavourful and satisfying bars. Using quality ingredients will make a difference. Here’s what you’ll need:
For the Oat Crust and Crumble Topping:
- Rolled Oats: 2 ½ cups (Use old-fashioned rolled oats for the best chewy texture, not instant or steel-cut)
- Flour: 1 ½ cups (All-purpose flour works well. You can substitute with whole wheat flour or a gluten-free 1-to-1 baking blend for dietary variations)
- Brown Sugar: ½ cup, packed (Light or dark brown sugar. Coconut sugar or maple sugar can be used as alternatives)
- Ground Cinnamon: 1 ½ teaspoons
- Baking Soda: ½ teaspoon
- Salt: ½ teaspoon (Enhances all the flavours)
- Unsalted Butter: 1 cup (2 sticks or 226g), cold and cut into small cubes (For a vegan option, use cold, firm coconut oil or a good quality vegan butter substitute)
For the Apple Date Filling:
- Apples: 4 medium apples, peeled, cored, and chopped into ½-inch pieces (about 4 cups chopped. Use firm, tart or sweet-tart apples like Honeycrisp, Granny Smith, Fuji, or Gala)
- Medjool Dates: 1 ½ cups, pitted and roughly chopped (About 12-15 large dates. Medjool dates are preferred for their soft texture and caramel flavour)
- Water: ½ cup (Needed to help cook down the apples and dates into a jammy filling)
- Lemon Juice: 1 tablespoon (Freshly squeezed brightens the apple flavour and prevents browning)
- Vanilla Extract: 1 teaspoon
- Ground Cinnamon: ½ teaspoon
- Optional Spices: ¼ teaspoon ground nutmeg, ⅛ teaspoon ground cloves or allspice (for extra warmth)
Instructions
Follow these steps carefully for perfectly baked Apple Oat Date Bars every time.
1. Prepare the Baking Pan and Oven:
- Preheat your oven to 375°F (190°C).
- Grease a 9×13 inch baking pan generously with butter or cooking spray.
- Line the pan with parchment paper, leaving an overhang on two opposite sides. This “sling” will make it much easier to lift the bars out after baking. Grease the parchment paper as well.
2. Make the Apple Date Filling:
- In a medium saucepan, combine the chopped apples, chopped pitted dates, water, lemon juice, vanilla extract, ½ teaspoon cinnamon, and any optional spices (nutmeg, cloves).
- Place the saucepan over medium heat. Bring the mixture to a simmer, stirring occasionally.
- Once simmering, reduce the heat to low, cover the saucepan, and let it cook for 15-20 minutes. Stir every few minutes to prevent sticking.
- Cook until the apples are very tender and the dates have broken down, creating a thick, jam-like consistency. If the mixture seems too dry, you can add another tablespoon or two of water.
- Mash the mixture slightly with the back of a spoon or a potato masher for a smoother filling, leaving some chunks for texture if desired.
- Remove the filling from the heat and set it aside to cool slightly while you prepare the oat mixture.
3. Prepare the Oat Crust and Crumble:
- In a large mixing bowl, whisk together the rolled oats, flour, brown sugar, 1 ½ teaspoons cinnamon, baking soda, and salt. Ensure there are no clumps of brown sugar.
- Add the cold, cubed butter (or cold, firm coconut oil/vegan butter) to the dry ingredients.
- Using a pastry blender, two knives, or your fingertips, cut the butter into the oat mixture. Work the butter in until the mixture resembles coarse crumbs, with some pea-sized pieces of butter remaining. Don’t overmix; you want those little butter pockets for a tender texture. Tip: If using your hands, work quickly to prevent the butter from melting too much.
4. Assemble the Bars:
- Take approximately two-thirds (about 4 cups) of the oat crumble mixture and press it firmly and evenly into the bottom of the prepared 9×13 inch baking pan. Use the bottom of a measuring cup or glass to help create a compact, even base layer. This firm base is crucial to hold the bars together.
- Spread the cooled apple-date filling evenly over the oat base, reaching close to the edges.
- Sprinkle the remaining one-third (about 2 cups) of the oat crumble mixture evenly over the top of the apple-date filling. Gently pat it down slightly, but don’t press as firmly as the base.
5. Bake the Bars:
- Place the baking pan in the preheated oven.
- Bake for 30-40 minutes, or until the oat topping is golden brown and the filling is bubbly around the edges. The exact time may vary depending on your oven.
- Keep an eye on it towards the end; you want a beautiful golden colour, not burnt.
6. Cool Completely:
- Once baked, remove the pan from the oven and place it on a wire rack.
- Crucially, allow the bars to cool completely in the pan before cutting. This step is essential! It will take at least 2-3 hours at room temperature, or you can speed it up slightly by placing it in the refrigerator after about an hour of initial cooling. Cooling allows the filling to set properly and prevents the bars from crumbling when sliced. Patience here is key for neat squares.
7. Slice and Serve:
- Once completely cool, use the parchment paper overhangs to carefully lift the entire slab out of the pan and onto a cutting board.
- Using a large, sharp knife, cut the slab into bars or squares. Wipe the knife clean between cuts if necessary, especially if the filling is sticking. You can typically get 16-24 bars depending on the size you prefer.
Nutrition Facts
- Servings: Approximately 16-24 bars (depending on cutting size)
- Calories per serving (estimated): Approximately 200-300 calories per bar (based on 20 servings).
Disclaimer: The nutritional information provided is an estimate only, calculated using standard ingredient databases. Actual calorie counts and nutritional values may vary depending on the specific ingredients used (e.g., type of apple, specific brand of oats or flour, substitutions like coconut oil), portion sizes, and preparation methods. For precise nutritional information, consult a certified nutritionist or use a reliable nutritional calculator with your exact ingredients. These bars are a source of dietary fiber from the oats, apples, and dates, and offer natural sweetness from the fruit.
Preparation Time
- Prep Time: 25-30 minutes (Includes chopping apples/dates, mixing filling and crumble)
- Cook Time: 30-40 minutes (Baking time)
- Cooling Time: 2-3 hours (Essential for setting)
- Total Time: Approximately 3 hours to 4 hours 10 minutes (Including cooling)
While the active preparation and baking time is relatively short (around 1 hour), the cooling time is significant but requires no effort. Plan accordingly!
Why You’ll Love These Apple Oat Date Bars
Beyond just being a recipe, these Apple Oat Date Bars offer a multitude of reasons to become a favourite in your baking repertoire:
- Incredibly Delicious: The combination of textures and flavours is simply irresistible. You get the chewy, slightly crisp oat base and crumble, contrasting beautifully with the soft, gooey, naturally sweet apple and date filling. The warmth of cinnamon ties everything together perfectly.
- Wholesome Ingredients: Packed with the goodness of rolled oats (hello, fiber!), nutrient-rich dates (natural sweetness, more fiber, potassium), and fresh apples (vitamins, fiber), these bars feel like a treat you can feel good about eating and serving.
- Naturally Sweetened Filling: The star filling relies heavily on the natural sugars present in dates and apples, significantly reducing the need for added refined sugars compared to many traditional crumble bars. The dates provide a deep, caramel-like sweetness that complements the apples wonderfully.
- Easy to Make: Despite the impressive results, the process is straightforward. Making the crumble and the filling are simple steps, and assembly is just layering. No complex techniques are required, making it suitable for beginner bakers.
- Versatile Snack or Dessert: These bars are incredibly adaptable. Enjoy them as:
- A quick grab-and-go breakfast.
- A satisfying mid-morning or afternoon snack.
- A wholesome addition to lunchboxes.
- A delightful dessert, perhaps warmed slightly and served with vanilla ice cream or yogurt.
- Fuel for hikes or outdoor activities.
- Customizable: The recipe is forgiving and easily adaptable. You can swap flours, adjust spices, add nuts or seeds, or even experiment with different fruits (see Variations section).
- Perfect for Using Seasonal Apples: Got an abundance of apples from the orchard or farmers market? This is a fantastic way to use them up deliciously.
- Crowd-Pleaser: Whether for family gatherings, potlucks, bake sales, or just a weekday treat, these bars are consistently popular with both kids and adults. The familiar flavours of apple and cinnamon are universally loved.
- Great for Meal Prep: Bake a batch at the beginning of the week, and you have healthy snacks ready to go for days. They store well, maintaining their texture and flavour.
The Magic Trio: Apples, Oats, and Dates
The success of these bars lies in the synergistic relationship between the three main components: apples, oats, and dates. Each brings unique qualities that contribute to the final delicious product.
- Apples: The quintessential autumn fruit, apples provide moisture, structure, and a bright, slightly tart flavour to balance the sweetness. When cooked down, they become tender and release their natural pectin, helping the filling to set. The choice of apple matters – firmer varieties like Honeycrisp, Granny Smith, Fuji, or Braeburn hold their shape better during cooking, providing pleasant chunks in the filling. Softer apples like McIntosh will cook down into more of an applesauce consistency, which is also delicious but offers less texture. The slight acidity, enhanced by the lemon juice, cuts through the richness and prevents the bars from tasting overly sweet.
- Oats: Rolled oats are the backbone of the crust and crumble. They provide a wonderful chewy texture and a nutty, wholesome flavour that pairs perfectly with apples and cinnamon. Oats are a fantastic source of soluble fiber, particularly beta-glucan, known for its heart-health benefits and ability to promote satiety. In this recipe, they absorb some of the butter and brown sugar, creating pockets of flavour and contributing to both the sturdy base and the delightful crumbly topping. Using old-fashioned rolled oats ensures the best texture; instant oats can become mushy, and steel-cut oats won’t soften enough.
- Dates: Medjool dates are the secret weapon for natural sweetness and a gooey, caramel-like texture in the filling. Unlike refined sugar, dates come packaged with fiber, potassium, magnesium, and antioxidants. When cooked with the apples and a little water, they break down into a luscious paste that binds the filling together and provides a deep, rich sweetness that complements the apples beautifully. Their natural stickiness helps create that desirable gooey texture that makes these bars so addictive. Soaking dried dates briefly in hot water can help if they seem particularly hard, but fresh, soft Medjool dates usually work perfectly straight from the package (just remember to remove the pits!).
Together, these three ingredients create a bar that is texturally interesting, flavourful, and packed with more nutritional benefits than your average sweet treat. It’s a combination that feels both comforting and nourishing.
Step-by-Step Guide to Perfect Apple Oat Date Bars
Let’s revisit the instructions with a bit more detail to ensure baking success:
- Prep is Key: Don’t skip preheating the oven (375°F/190°C) or preparing the pan. The parchment paper sling is your best friend for easy removal. Grease both the pan and the paper to prevent any sticking.
- Simmer the Filling: Combine the chopped apples, dates, water, lemon juice, vanilla, and spices in a saucepan. The initial simmer over medium heat gets things going, then reduce to low and cover. This gentle cooking allows the apples to soften without burning and the dates to meld into the mixture. Stirring prevents scorching on the bottom. Aim for very tender apples and a thick, jammy consistency after 15-20 minutes. A little mashing creates a smoother filling, but some apple chunks add nice texture. Let it cool slightly – putting hot filling on the crust can make the base soggy.
- Make the Crumble: In a large bowl (to avoid spills), whisk the dry ingredients (oats, flour, brown sugar, cinnamon, baking soda, salt) thoroughly. This ensures even distribution of leavening and flavour. Cut in the cold butter (or alternative) using your preferred method (pastry blender, knives, fingers). The goal is a coarse meal with some larger butter pieces remaining. These pieces create steam during baking, leading to a more tender crumb. Don’t overwork it into a paste.
- Layering Technique:
- Base: Use about two-thirds of the crumble. Press it firmly into the pan. This is crucial for a bar that holds its shape. Use the flat bottom of a glass or measuring cup for even pressure.
- Filling: Spread the slightly cooled apple-date mixture evenly over the base. An offset spatula works well here.
- Topping: Sprinkle the remaining one-third of the crumble loosely over the filling. Pat gently just to secure it, but don’t compact it like the base. You want a rustic, crumbly top.
- Baking to Perfection: Bake for 30-40 minutes. Look for visual cues: the topping should be a beautiful golden brown, and you might see the filling bubbling gently around the edges. Ovens vary, so start checking around the 30-minute mark.
- The Crucial Cool Down: This cannot be stressed enough. Resist the urge to cut into the warm bars! They need at least 2-3 hours at room temperature (or a sped-up process involving the fridge after initial cooling) to fully set. The filling firms up as it cools, and the oat base solidifies. Cutting them warm will likely result in a crumbly mess. Patience yields perfectly neat, stable bars.
- Slicing: Once completely cool, lift the slab out using the parchment handles. Place on a cutting board. Use a long, sharp knife. For the cleanest cuts, you can chill the slab briefly in the fridge before slicing. Wipe the knife clean between cuts if needed. Decide on your portion size – 16 (4×4 grid), 20 (4×5 grid), or 24 (4×6 grid) are common yields from a 9×13 pan.
How to Serve Your Delicious Apple Oat Date Bars
These bars are fantastic on their own, but here are some ideas to elevate them further or fit them into different occasions:
- Simply As Is: Perfect for a quick breakfast, lunchbox treat, or afternoon snack straight from the container.
- Warmed Up: Gently warm a bar in the microwave for 10-15 seconds for a comforting, freshly-baked feel.
- With a Hot Beverage: Pair a bar with your morning coffee, a cup of tea (chai or black tea works beautifully), or a warm mug of spiced apple cider.
- À La Mode: Serve a slightly warmed bar with a scoop of vanilla bean ice cream or cinnamon ice cream for a wonderful dessert. The contrast between warm bar and cold ice cream is classic.
- Yogurt Parfait Style: Crumble a bar over a bowl of plain Greek yogurt or vanilla yogurt. Add a sprinkle of extra nuts or seeds for a more substantial breakfast or snack.
- Drizzled Delights: Enhance the flavour with a drizzle of:
- Salted caramel sauce
- Maple syrup
- Melted peanut butter or almond butter
- A simple powdered sugar glaze (mix powdered sugar with a tiny bit of milk or water)
- With Whipped Cream: A dollop of lightly sweetened whipped cream adds a touch of elegance for dessert.
- On a Snack Platter: Cut into smaller squares and include them on a platter with fresh fruit, cheese, and nuts for gatherings.
Storage Instructions
Proper storage ensures your Apple Oat Date Bars stay fresh and delicious:
- Room Temperature: Once completely cooled, store the bars in an airtight container at room temperature. Place parchment paper between layers if stacking to prevent sticking. They will stay fresh for up to 3-4 days. The texture will be softest at room temperature.
- Refrigerator: For longer storage, place the bars in an airtight container in the refrigerator. They will last for up to a week. Note that chilling will make the bars firmer; you might want to let them sit at room temperature for a few minutes before eating or warm them slightly.
- Freezer: These bars freeze exceptionally well! Once cooled and cut, wrap individual bars tightly in plastic wrap, then place them in a freezer-safe airtight container or zip-top bag. They can be frozen for up to 2-3 months.
- Thawing: Thaw frozen bars overnight in the refrigerator or on the counter at room temperature for a couple of hours. You can also gently warm a frozen bar in the microwave for about 20-30 seconds.
Additional Tips for Success
- Choose the Right Apples: As mentioned earlier, firm apples that hold their shape when baked are ideal for texture (Honeycrisp, Granny Smith, Fuji, Gala, Braeburn). Using a mix of tart and sweet apples often yields the most balanced flavour.
- Don’t Over-Process the Crumble: When cutting the butter into the dry ingredients, stop when the mixture resembles coarse crumbs with some larger, pea-sized pieces of butter still visible. Over-mixing can lead to a tough or dense crust/topping instead of a tender, crumbly one.
- Press the Base Firmly: Compacting the bottom layer of the oat mixture creates a stable foundation that prevents the bars from falling apart. Use the bottom of a flat glass or measuring cup to press it down evenly and tightly across the entire pan.
- Patience with Cooling: It’s worth repeating – let the bars cool completely in the pan before attempting to lift them out or cut them. This allows the filling to set fully and prevents a crumbly mess. This is arguably the most critical step for well-structured bars.
- Soak Dates if Necessary: If your dates (especially types other than Medjool) feel dry or hard, soak them in hot water for 10-15 minutes before chopping and adding them to the filling. Drain them well before using. This ensures they break down properly and contribute to the gooey texture.
Variations and Substitutions
Feel free to customize these bars to suit your taste or dietary needs:
- Gluten-Free: Substitute the all-purpose flour with a good quality gluten-free 1-to-1 baking blend (one that contains xanthan gum). Ensure your rolled oats are certified gluten-free to avoid cross-contamination.
- Vegan: Replace the unsalted butter with an equal amount of cold, firm coconut oil (refined for less coconut flavour, unrefined if you like it) or a high-quality stick-style vegan butter substitute. Ensure all other ingredients are vegan (most naturally are).
- Nutty Crunch: Add ½ cup of chopped walnuts, pecans, or almonds to the oat crumble mixture for added texture and flavour. Toasting the nuts beforehand enhances their flavour even more.
- Seed Boost: Mix in 2-4 tablespoons of chia seeds, flax seeds (ground or whole), sunflower seeds, or pumpkin seeds into the oat crumble mixture for extra nutrients and texture.
- Spice It Up: Adjust the spices to your liking. Increase the cinnamon, add ginger, cardamom, or use a pre-mixed apple pie spice blend.
- Different Fruit: While apples are classic, you could experiment by replacing half the apples with firm pears or adding a handful of cranberries or raisins to the filling along with the apples and dates.
- Lower Sugar: If you want to reduce the sugar further, you can slightly decrease the brown sugar in the oat mixture, relying more on the dates for sweetness. Start by reducing it to ⅓ cup and see how you like it.
- Orange Zest: Add the zest of half an orange to the apple-date filling along with the lemon juice for a different citrusy brightness.
Frequently Asked Questions (FAQ)
Q1: Can I use quick-cooking oats instead of rolled oats?
A1: It’s not recommended. Quick-cooking oats are thinner and more processed than rolled oats. They will absorb liquid differently and can result in a mushier texture for the crust and topping, rather than the desired chewy, distinct oat texture. Stick with old-fashioned rolled oats for the best results. Steel-cut oats are also unsuitable as they won’t cook properly in this application.
Q2: Can I make these Apple Oat Date Bars gluten-free?
A2: Yes, absolutely! To make them gluten-free, use a certified gluten-free 1-to-1 baking flour blend in place of the all-purpose flour and ensure your rolled oats are certified gluten-free (oats are naturally gluten-free but often processed in facilities with wheat). The rest of the ingredients are typically naturally gluten-free, but always double-check labels if celiac disease or severe sensitivity is a concern.
Q3: Can I make these bars vegan?
A3: Yes, easily! The main substitution needed is for the butter. Use an equal amount of cold, firm coconut oil (use refined if you want to avoid coconut flavour) or a good quality vegan butter substitute (stick form works best for cutting in). Cut it into the oat mixture just like you would with butter. All other typical ingredients (oats, flour, apples, dates, sugar, spices, lemon juice, vanilla) are generally vegan, but check labels if needed.
Q4: My bars seem too crumbly. What did I do wrong?
A4: There are a few common reasons for crumbly bars:
* Not pressing the base firmly enough: The bottom layer needs to be well-compacted to form a solid foundation.
* Cutting while warm: The bars must cool completely (2-3 hours) to allow the filling and crust to set before slicing. Cutting them even slightly warm can cause them to fall apart.
* Incorrect measurement ratio: Double-check your flour, oat, and butter measurements. Too much dry ingredient or not enough binder (butter) can lead to crumbliness.
* Over-baking: If baked too long, the bars can dry out, making them more prone to crumbling. Bake until just golden brown and set.
Q5: Can I freeze these Apple Oat Date Bars?
A5: Yes, they freeze beautifully! Once the bars are completely cooled and cut, wrap them individually in plastic wrap or aluminum foil. Place the wrapped bars in a freezer-safe airtight container or zip-top bag to prevent freezer burn. They can be stored in the freezer for up to 3 months. Thaw individual bars at room temperature, in the refrigerator, or give them a quick warm-up in the microwave.
Apple Oat Date Bars Recipe
Ingredients
For the Oat Crust and Crumble Topping:
- Rolled Oats: 2 ½ cups (Use old-fashioned rolled oats for the best chewy texture, not instant or steel-cut)
- Flour: 1 ½ cups (All-purpose flour works well. You can substitute with whole wheat flour or a gluten-free 1-to-1 baking blend for dietary variations)
- Brown Sugar: ½ cup, packed (Light or dark brown sugar. Coconut sugar or maple sugar can be used as alternatives)
- Ground Cinnamon: 1 ½ teaspoons
- Baking Soda: ½ teaspoon
- Salt: ½ teaspoon (Enhances all the flavours)
- Unsalted Butter: 1 cup (2 sticks or 226g), cold and cut into small cubes (For a vegan option, use cold, firm coconut oil or a good quality vegan butter substitute)
For the Apple Date Filling:
- Apples: 4 medium apples, peeled, cored, and chopped into ½-inch pieces (about 4 cups chopped. Use firm, tart or sweet-tart apples like Honeycrisp, Granny Smith, Fuji, or Gala)
- Medjool Dates: 1 ½ cups, pitted and roughly chopped (About 12-15 large dates. Medjool dates are preferred for their soft texture and caramel flavour)
- Water: ½ cup (Needed to help cook down the apples and dates into a jammy filling)
- Lemon Juice: 1 tablespoon (Freshly squeezed brightens the apple flavour and prevents browning)
- Vanilla Extract: 1 teaspoon
- Ground Cinnamon: ½ teaspoon
- Optional Spices: ¼ teaspoon ground nutmeg, ⅛ teaspoon ground cloves or allspice (for extra warmth)
Instructions
1. Prepare the Baking Pan and Oven:
- Preheat your oven to 375°F (190°C).
- Grease a 9×13 inch baking pan generously with butter or cooking spray.
- Line the pan with parchment paper, leaving an overhang on two opposite sides. This “sling” will make it much easier to lift the bars out after baking. Grease the parchment paper as well.
2. Make the Apple Date Filling:
- In a medium saucepan, combine the chopped apples, chopped pitted dates, water, lemon juice, vanilla extract, ½ teaspoon cinnamon, and any optional spices (nutmeg, cloves).
- Place the saucepan over medium heat. Bring the mixture to a simmer, stirring occasionally.
- Once simmering, reduce the heat to low, cover the saucepan, and let it cook for 15-20 minutes. Stir every few minutes to prevent sticking.
- Cook until the apples are very tender and the dates have broken down, creating a thick, jam-like consistency. If the mixture seems too dry, you can add another tablespoon or two of water.
- Mash the mixture slightly with the back of a spoon or a potato masher for a smoother filling, leaving some chunks for texture if desired.
- Remove the filling from the heat and set it aside to cool slightly while you prepare the oat mixture.
3. Prepare the Oat Crust and Crumble:
- In a large mixing bowl, whisk together the rolled oats, flour, brown sugar, 1 ½ teaspoons cinnamon, baking soda, and salt. Ensure there are no clumps of brown sugar.
- Add the cold, cubed butter (or cold, firm coconut oil/vegan butter) to the dry ingredients.
- Using a pastry blender, two knives, or your fingertips, cut the butter into the oat mixture. Work the butter in until the mixture resembles coarse crumbs, with some pea-sized pieces of butter remaining. Don’t overmix; you want those little butter pockets for a tender texture. Tip: If using your hands, work quickly to prevent the butter from melting too much.
4. Assemble the Bars:
- Take approximately two-thirds (about 4 cups) of the oat crumble mixture and press it firmly and evenly into the bottom of the prepared 9×13 inch baking pan. Use the bottom of a measuring cup or glass to help create a compact, even base layer. This firm base is crucial to hold the bars together.
- Spread the cooled apple-date filling evenly over the oat base, reaching close to the edges.
- Sprinkle the remaining one-third (about 2 cups) of the oat crumble mixture evenly over the top of the apple-date filling. Gently pat it down slightly, but don’t press as firmly as the base.
5. Bake the Bars:
- Place the baking pan in the preheated oven.
- Bake for 30-40 minutes, or until the oat topping is golden brown and the filling is bubbly around the edges. The exact time may vary depending on your oven.
- Keep an eye on it towards the end; you want a beautiful golden colour, not burnt.
6. Cool Completely:
- Once baked, remove the pan from the oven and place it on a wire rack.
- Crucially, allow the bars to cool completely in the pan before cutting. This step is essential! It will take at least 2-3 hours at room temperature, or you can speed it up slightly by placing it in the refrigerator after about an hour of initial cooling. Cooling allows the filling to set properly and prevents the bars from crumbling when sliced. Patience here is key for neat squares.
7. Slice and Serve:
- Once completely cool, use the parchment paper overhangs to carefully lift the entire slab out of the pan and onto a cutting board.
- Using a large, sharp knife, cut the slab into bars or squares. Wipe the knife clean between cuts if necessary, especially if the filling is sticking. You can typically get 16-24 bars depending on the size you prefer.
Nutrition
- Serving Size: One Normal Portion
- Calories: 200-300